Replacement of macOS Server: Calendar, Contacts, and Mail
Introduction
See New self-signed SSL Certificate for iOS 13 for important compatibility information.
A long time ago, iTunes allowed you to sync your calendars and contacts among your iOS devices and a Mac OS computer. I was happy with that. Then, that feature went away.
I didn't want to use iCloud. I preferred to have syncing under my own control. I didn't like being forced to send my stuff to Apple's server out there.
Fortunately, at that time Apple offered its Mac OS Server product, which made it very easy to set up an in-house calendar, contacts, and email server. It was only $20. I installed it on a Mac Mini in my small home network. We could even share calendars among family members. Problem solved. I was happy with that.
Then, Apple announced that many features would be removed from macOS Server, including the calendar and, contact servers.
-- MacObserver Jan 2018 | Apple Seemingly Kills macOS Server, Deprecates Many Essential Services
As long as I remained on macOS 10.13 (High Sierra) I could continue to use those features on the last compatible version of macOS Server (5.4). But if I updated to macOS 10.14 (Mojave), I would have to update to macOS Server 5.7, which eliminated those features. I wanted to update my system, so it was time to do something about it.
Apple provided a migration document that suggested a number of open-source alternatives; the list included their own open-source CalendarServer project, which was actually at the core of their macOS Server product. As a reasonably experienced developer and user of software on both macOS and Linux, it seemed like it would be fairly straightforward to install and set up replacements for the calendar and contacts server. It wasn't.
Now, especially if you think of yourself as a pretty savvy computer person, there's always the nightmare that if you say, "This does not work," that someone will come along and say, "Of course it works. You just left out this one simple step, which was completely obvious and which you totally missed. Because you're stupid." Well maybe not that last bit, but that's what it feels like.
However, in the context of Apple's "It just works," aspirations, I claim that if something doesn't work after a few hours of effort, then it is the project (or its documentation) that is broken, not the user.
And so, I record below the steps I took to get a working replacement for the macOS Server calendar and contacts server, using apache, DAViCal, postfix, dovecot on CentOS 7 in VirtualBox on macOS. I hope it saves someone else a few hours or days.
Contents
- Introduction
- Failed Alternatives
- My network, which may differ from yours
- Assumed skills
- Failed Alternatives
- Install VirtualBox
- Install CentOS
- Preliminary Setup
- Set up DAViCal
- Set up SSL
- Set up Apache
- Set up calendar and contacts clients
- Set up email server
- Set up email accounts
- Set up email clients
- Scripts to start and stop server system
- LaunchAgent to start and stop server
- Data Migration
- Sharing Calendars
Failed Alternatives
I wanted something easy and simple. I tried things roughly in order of what I thought would be easy and simple.
I was unsuccessful with the following for one reason or another. If you were able to make one of these work, please 1) write a blog post about your success, detailing all the steps, and 2) send me email about it, so I can add a link to it here. (Note: Claiming that something should work doesn't count.)
- CalendarServer on macOS 10.14. Scattered and incomplete documentation. Unable to install.
- Radicale on macOS 10.14. Able to install. Unable to add account from Apple client.
- ownCloud Appliance in VirtualBox.
- sabre/dav on CentOS 7 in VirtualBox. Unable to connect from Mac client
- Radicale on CentOS 7 on VirtualBox. Able to install. Unable to add account from Apple client.
- CalendarServer on Ubuntu 18.04.1 on VirtualBox.
My network and system, which may differ from yours
These notes are to provide context for the instructions that follow. Make whatever translations are appropriate for your own environment.
- My home network uses the private address space 172.16.1.0/24, behind a firewall appliance.
- Every device on the home network has a static IP address. DHCP is not used.
- The Mac Mini acting as my home server is at 172.16.1.22. The virtual server running on it will have IP address 172.16.1.123. The router is at 172.16.1.10.
- The Mac Mini is connected to the network via Ethernet cable (not WiFi).
- The Mac Mini (late 2012 model, 4GB RAM) is initially running macOS Server 5.4 on macOS 10.13.6.
- The user account on the Mac Mini is michael. (Yes, that's me.)
- The administrative user on the VM system is admin.
- The names user1, user2 are used to represent other users on the VM system.
- My internet provider's DNS servers are represented by the placeholder 0.0.0.0. (This needs to be replaced by an actual DNS server's IP address.)
- The versions of open-source software that I used are shown in brackets, e.g. [7.6.1810]. There may be newer version by the time you read this. Minor updates are likely to work the same way; major updates might not.
Assumed skills
The following instructions assume you already have the following skills:
- Experience installing and using the macOS Server calendar and contacts servers.
- Familiarity with downloading and installing Mac software.
- Knowing what a VM (Virtual Machine) is.
- Familiarity with using the command line in macOS terminal.
- Experience installing and using some variety of Linux.
- Experience setting up a static IP address on a computer. (Includes making appropriate choices for Manual IPv4 configuration, IP address, Subnet mask, Router, DNS Servers.)
- Familiarity with common Unix command-line tools, such as
sudo, ls, mv, cp. - Ability to use a command line editor. (I use
vi. Some people likenano, because it's simpler. Some people likeemacs, because it's more complicated.)
Also important:
- The ability to deal with instructions that aren't bullet-proof.
- Trouble-shooting skills and a tolerance for frustration.
I repeatedly found glitches and incompatibilities while trying to work out these instructions. There are likely to be others that aren't documented here.
Install VirtualBox
Download the latest package [6.0.0] for OS X Hosts from https://virtualbox.org.
Since they list SHA256 checksums for the downloads, it's good practice to compare the corresponding values:
Mac-mini:~ michael$ shasum -a 256 /Users/michael/Downloads/VirtualBox-6.0.0-127566-OSX.dmg
ab116b29b19a6bf85163d3146c97c8b0bc9625cc78365ed4eb8c87c94042dd9a  /Users/michael/Downloads/VirtualBox-6.0.0-127566-OSX.dmg
Mac-mini:~ michael$ curl -s https://www.virtualbox.org/download/hashes/6.0.0/SHA256SUMS | grep OSX
ab116b29b19a6bf85163d3146c97c8b0bc9625cc78365ed4eb8c87c94042dd9a *VirtualBox-6.0.0-127566-OSX.dmg
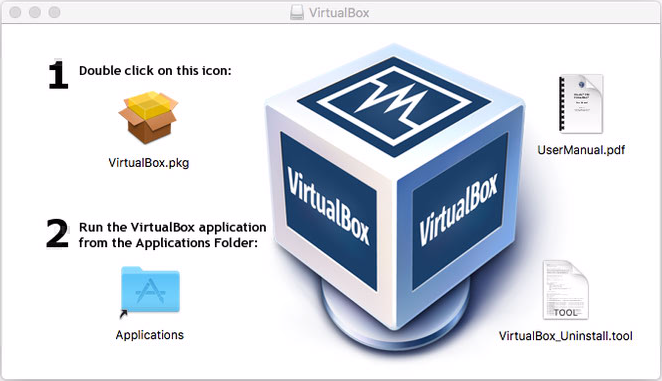
Double-click the .dmg file and install VirtualBox:
If your system is picky, you may see this during the installation process:
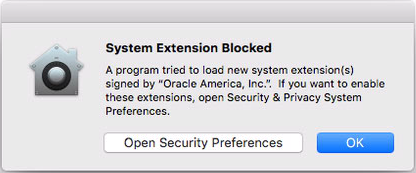
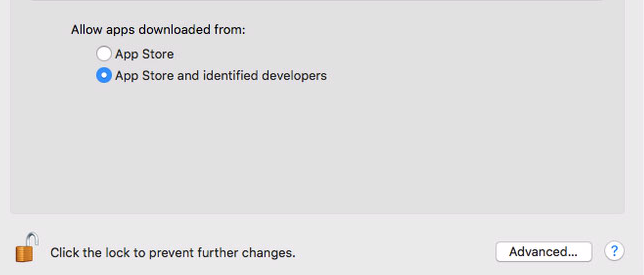
Go ahead and click "Open Security Preferences." When the Preferences pane opens, click the lock:

Then click "Allow":

If the allow button goes away, then the installation will probably succeed:
If it doesn't go away, then the installation will probably fail, and more fiddling will be necessary. There is much discussion of how to get the Allow button to work on Stack Overflow and StackExchange."
Suggestions include:
- Close the installer. Eject the installer virtual disk. Click the Allow button. Retry.
- Wait to click the Allow button until the installer screen with the "Change Install Location" button appears.
- Reboot into recovery mode and disable kext-consent, as described here
- Wait 5 minutes, then try again. Wait 20 minutes, then try again.
- Don't use Remote Access to click the Allow button.
- Try the same fix from above 5 or 6 more times.
What appeared to worked for me was keeping the Security pane open while attempting to install VirtualBox, and clicking the Allow button repeatedly during the process, occasionally clicking back on the install screen. It seemed to take when the installer displayed the "Writing files..." message. (Probably a fair amount of cargo-cult there...)
Install CentOS
Download the latest DVD ISO [7.6.1810] from https://www.centos.org/download/.
Look in the latest release notes for the checksum:
6d44331cc4f6c506c7bbe9feb8468fad6c51a88ca1393ca6b8b486ea04bec3c1 CentOS-7-x86_64-DVD-1810.iso
And compare that with the checksum of the downloaded file. (Note: big file takes a while to checksum.)
Mac-mini:~ michael$ shasum -a 256 /Users/michael/Downloads/CentOS-7-x86_64-DVD-1810.iso
6d44331cc4f6c506c7bbe9feb8468fad6c51a88ca1393ca6b8b486ea04bec3c1  /Users/michael/Downloads/CentOS-7-x86_64-DVD-1810.iso
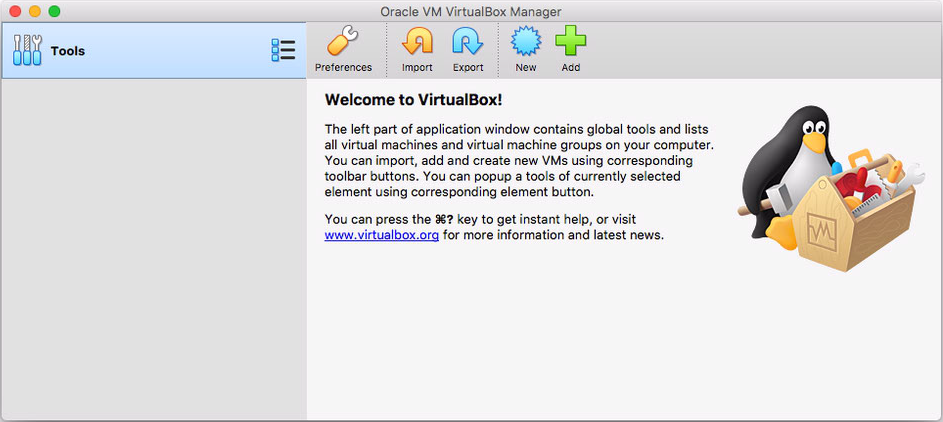
Double-click the VirtualBox icon in the Applications folder.
In the main VirtualBox window, click the New icon.
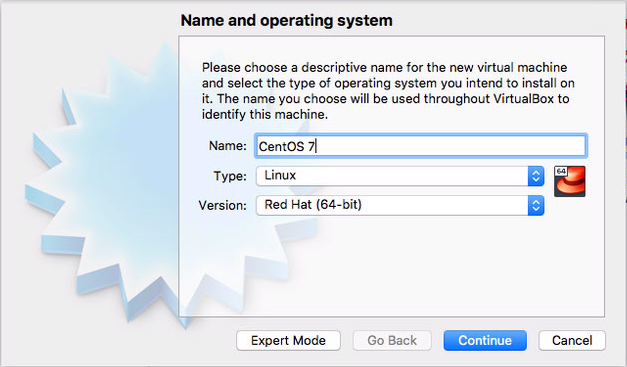
In the "Name and operating system" dialog, enter "CentOS 7" and click Continue. (VirtualBox will automatically deduce the right values for the other fields from the name.)
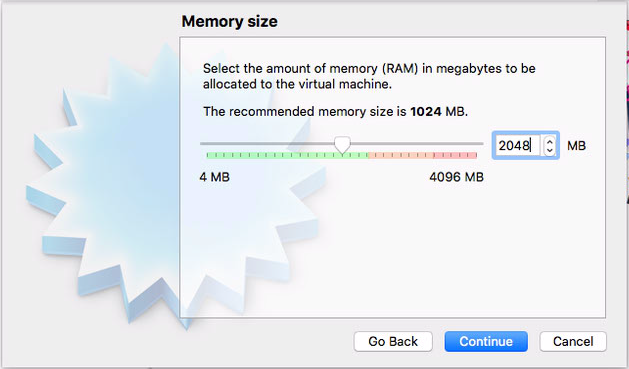
In the "Memory size" dialog, change the size to 2048. Click Continue.
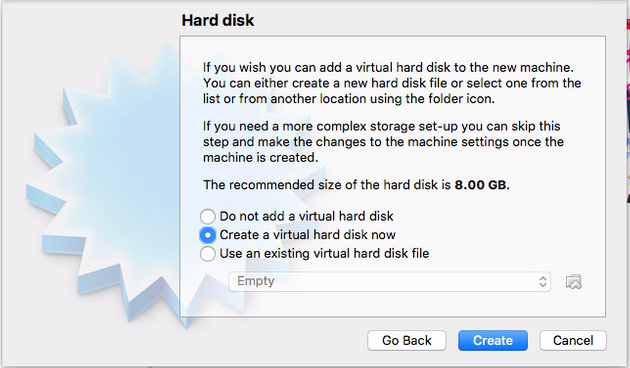
In the "Hard disk" dialog, leave the choice at "Create a virtual hard disk now" and click Continue
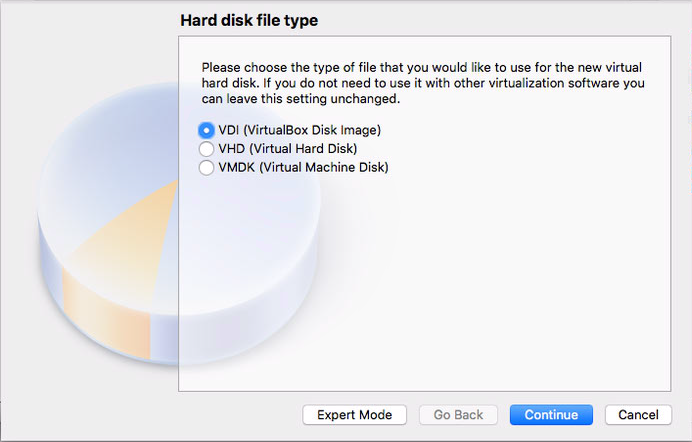
In the "Hard disk file type" dialog, leave the choice at "VDI (VirtualBox Disk Image)" and click Continue.
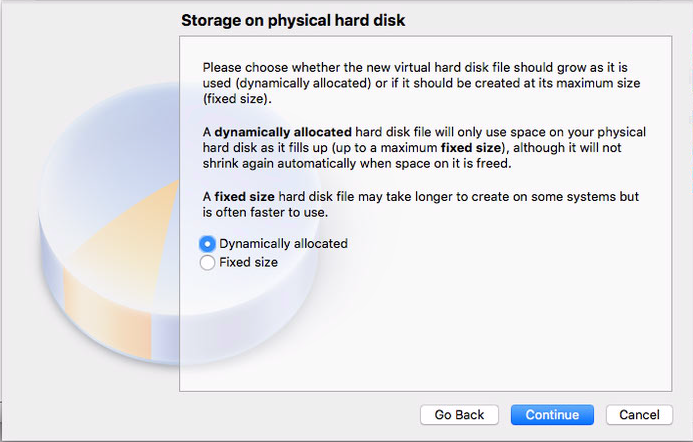
In the "Storage on physical hard disk" dialog, leave the choice at "Dynamically allocated" and click Continue.
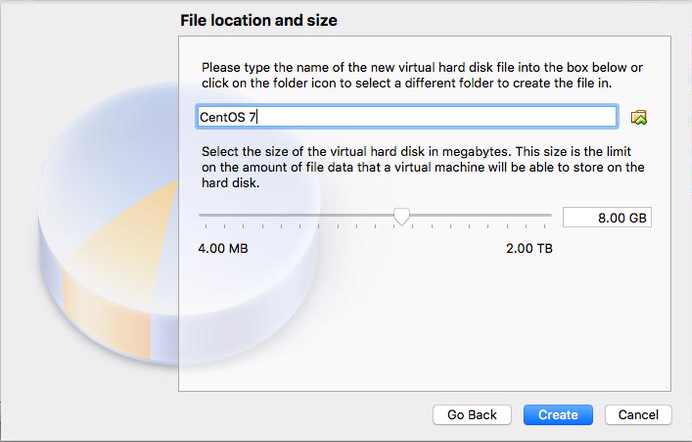
In the "File location and size" dialog, leave the choices at "CentOS 7" and "8.00 GB" and click Create.
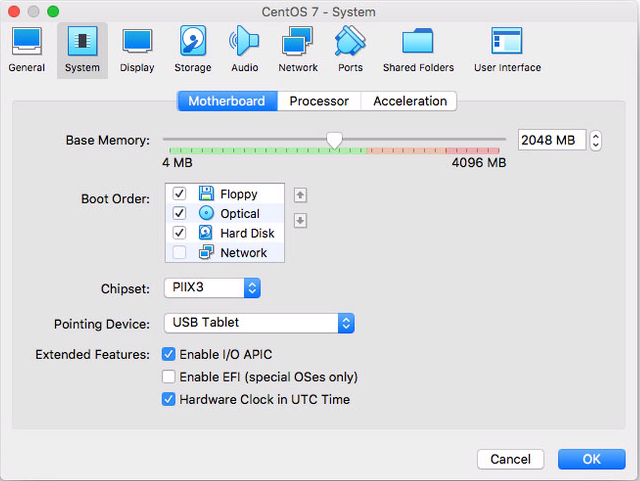
Click the Settings icon in the main VirtualBox window. Select the System tab. Change the Pointing Device from "PS/2 Mouse" to "USB Tablet." This works around a problem that sometimes causes the cursor in the VM window to freeze or become invisible.
Select the Display tab in the Settings window. Change the Graphics Controller to VBoxVGA. This allows for a convenient screen size (larger than 800x600) when installing the operating system.

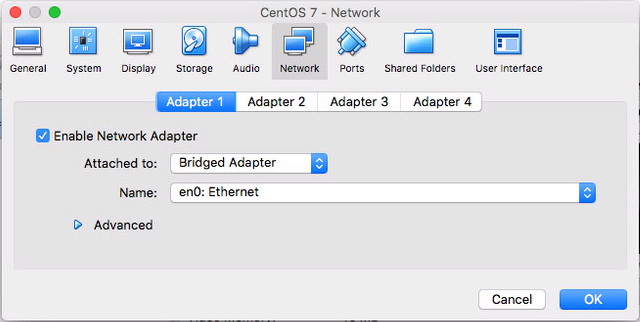
Select the Network tab in the Settings window. Change the entry for "Attached to:" to "Bridged Adapter." Click OK to save the new settings.
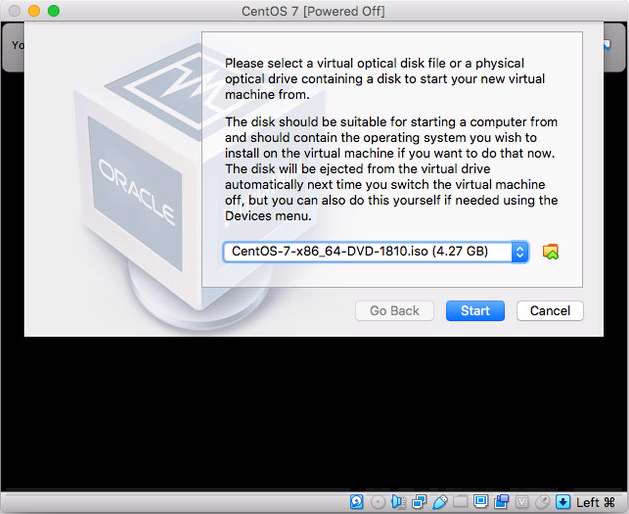
Click the Start icon in the main VirtualBox window. Click the icon
![]() to show a file-select dialog. Choose the CentOS .iso file previously downloaded. Click the Start button at the bottom of the dialog.
to show a file-select dialog. Choose the CentOS .iso file previously downloaded. Click the Start button at the bottom of the dialog.
A note will appear at the top of the screen. Click the "Don't show again" icon
![]() to dismiss it and prevent it from appearing again.
to dismiss it and prevent it from appearing again.
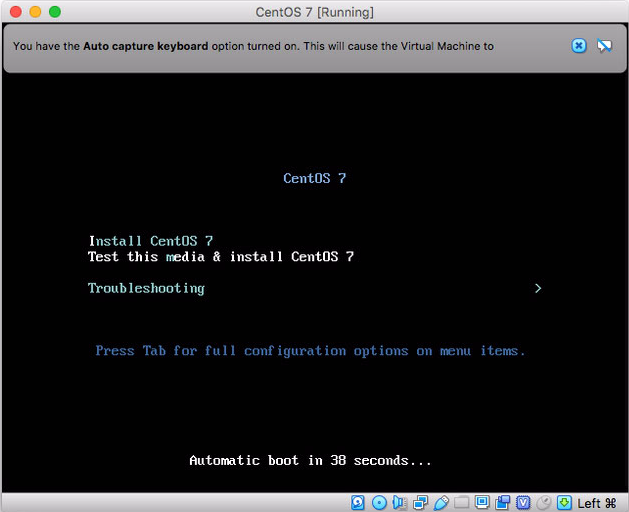
Hit the "Up arrow" key to select "Install CentOS 7" and then hit the return key.
Another note will appear at the top of the screen. Click the "Don't show again" icon
![]() to dismiss it and prevent it from appearing again.
to dismiss it and prevent it from appearing again.
When the language-selection screen appears, click inside the window. Read the alert, select "Do not show this message again" and click Capture.

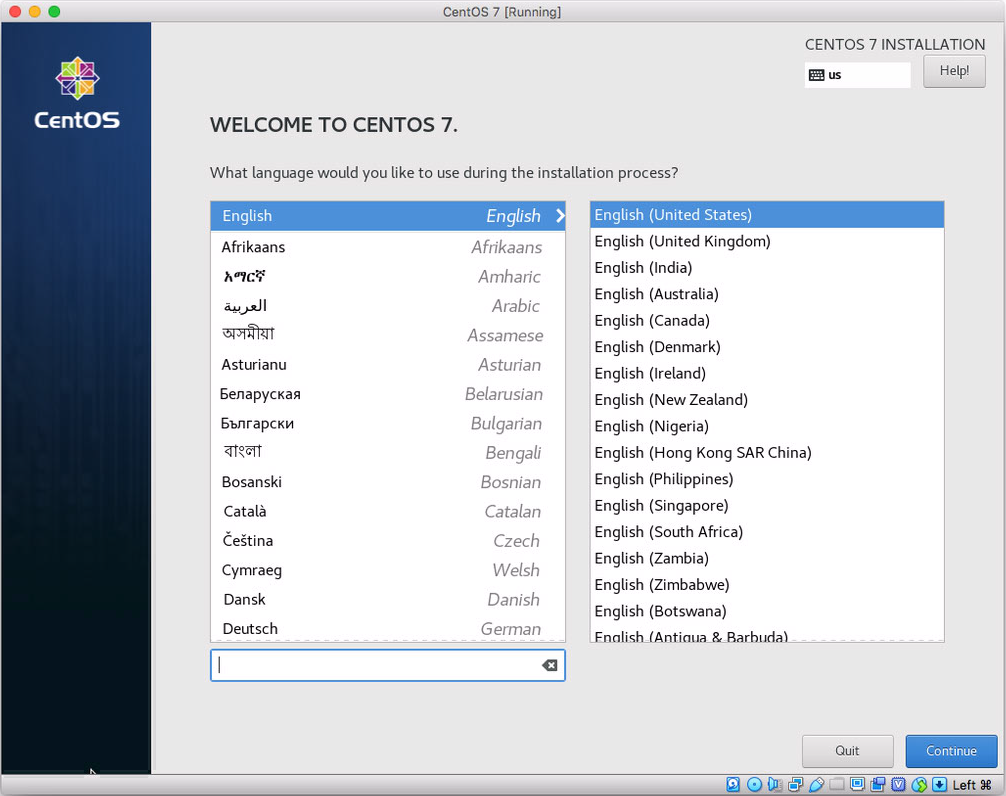
Select language and click Continue.
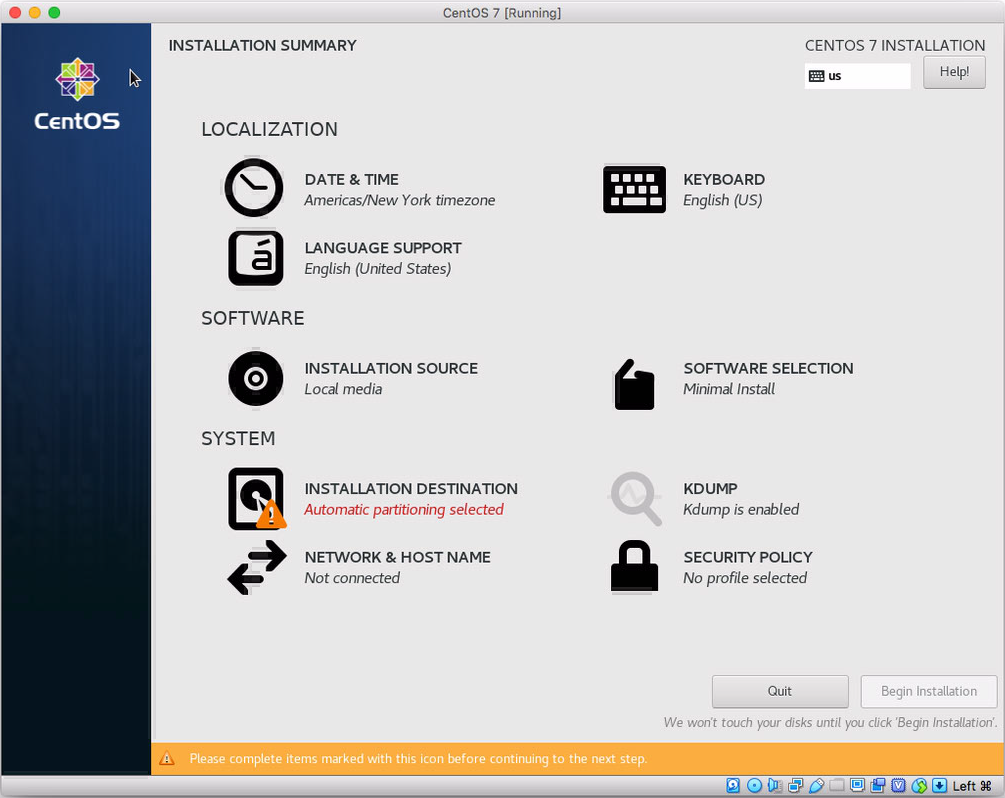
Installation summary:
- Click the "Network & host name" icon in the Installation Summary screen, and set up the network connection. (See below.)
- Click the "Date & time" icon in the Installation Summary screen, and choose your time zone.
- Click the "Installation destination" icon in the Installation Summary screen, and then click the Done button in the Installation destination screen. This confirms the selection of Automatic partitioning.
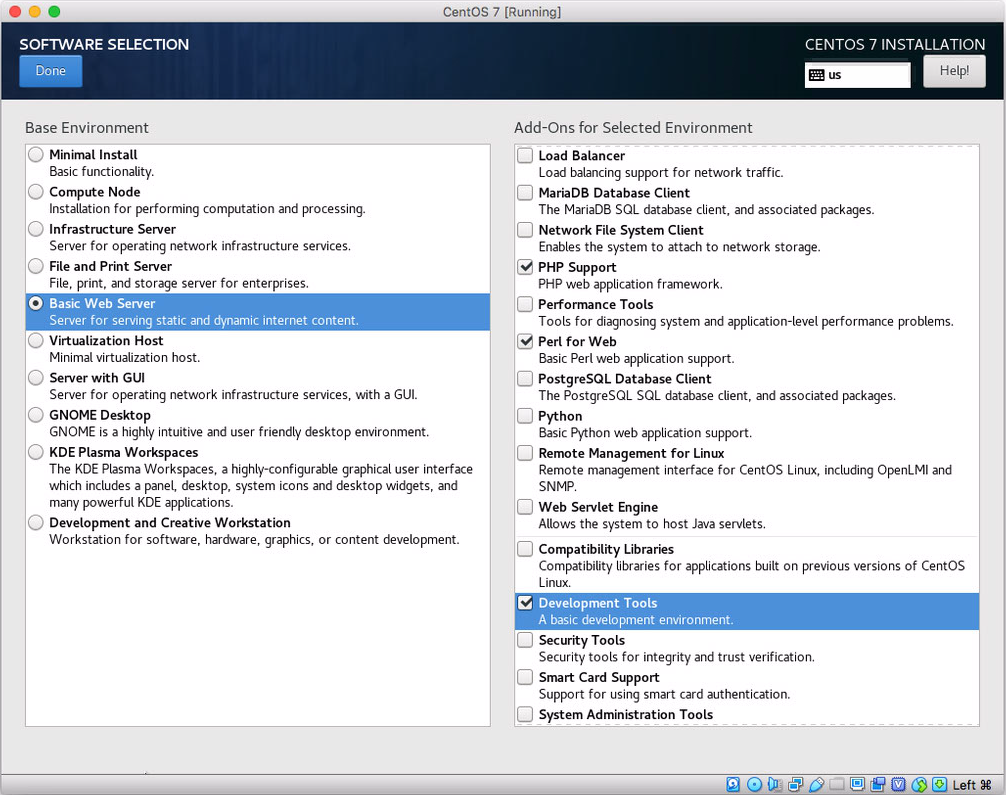
- Click the "Software selection" icon in the Installation Summary screen. In the Software selection screen, select "Basic Web Server" on the left and check "PHP Support," "Perl for Web," and "Development Tools" on the right. (See below.)
- Wait for the "Begin installation" button to enable, then click it.
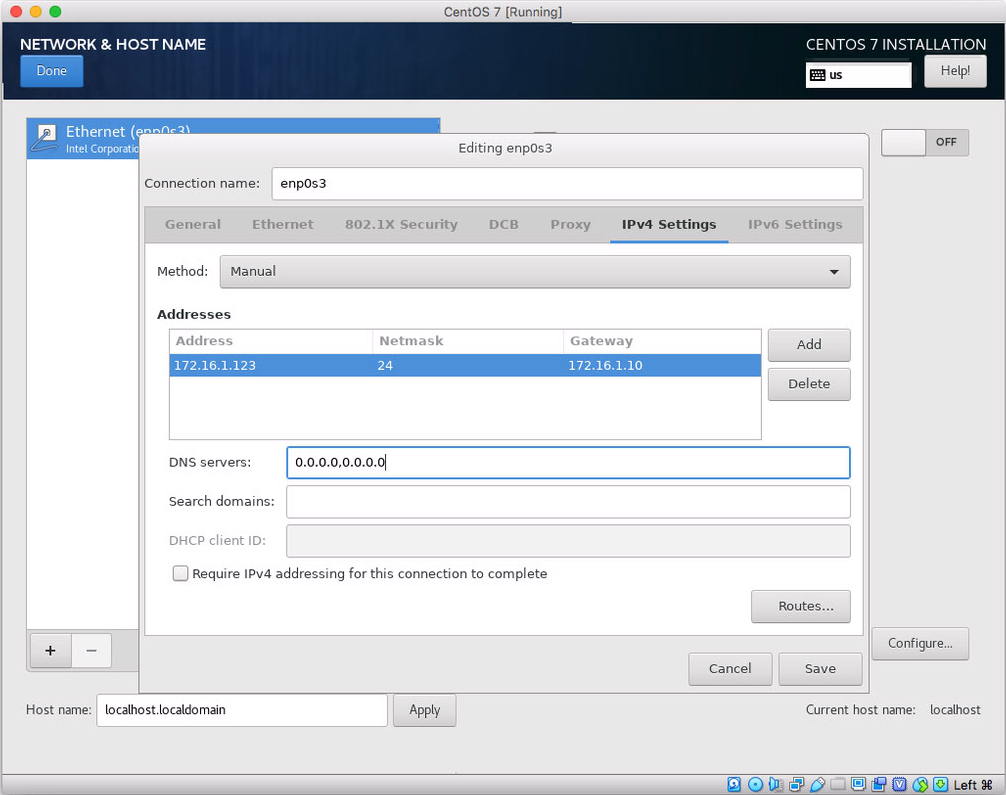
Network & host name screen, Configure dialog: Set up a static IP address for the system, and click the Save button. Be sure to turn on networking via the on/off switch in the upper right corner, then click Done.
Software selection screen:
Once installation begins, this configuration screen will appear. Click the Root password icon, and set up a root password.
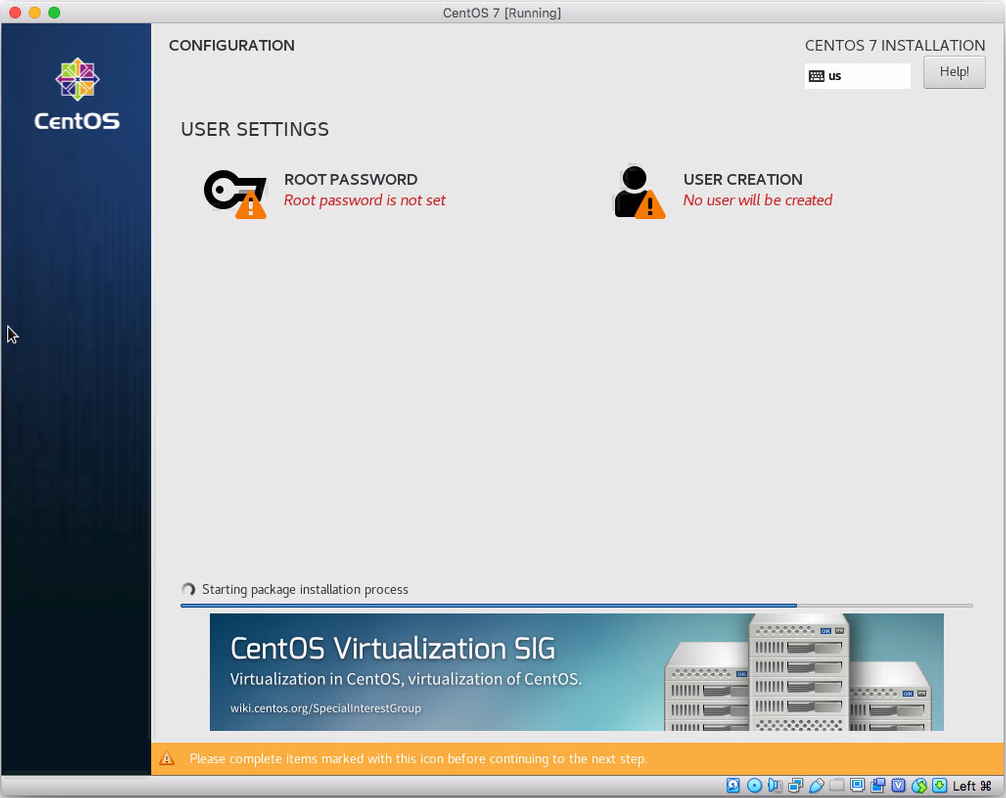
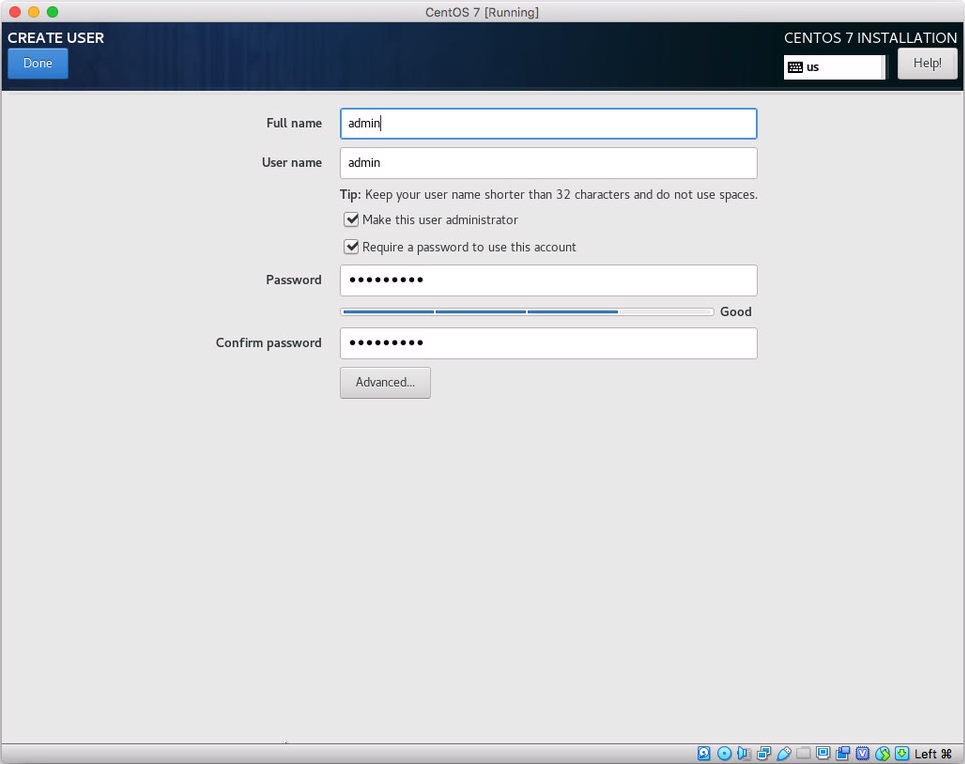
Click the User creation icon, and set up a user with administrator privileges.
When installation is complete, a Reboot button will appear at the bottom of the Configuration screen. Click it. When until the system is finished rebooting and
localhost login:
appears on the screen.
Preliminary setup
From this point on, it is more convenient to work on the virtual system via ssh, instead of typing in the virtual machine's window. In the Utilities subfolder of the Applications folder (on any Mac in your network), double-click the Terminal application, and type:
ssh admin@172.16.1.123
The first time this is done, a warning will appear; answer "yes" when prompted.
Mac-Pro:~ michael$ ssh admin@172.16.1.123
The authenticity of host '172.16.1.123 (172.16.1.123)' can't be established.
ECDSA key fingerprint is SHA256:skhYG1XMbQvL6y2rEoKTmAS7MLDRYyhEjQooB/kF820.
Are you sure you want to continue connecting (yes/no)? yes
Warning: Permanently added '172.16.1.123' (ECDSA) to the list of known hosts.
sudo poweroff
to perform a clean shutdown of the VM. Wait until the VM window closes before quitting from VirtualBox. To start again later, launch VirtualBox, select the "CentOS 7" VM, and click the Start button in the main VirtualBox window.
First, update everything, and reboot:
sudo yum update
sudo reboot
sudo su
vi /etc/default/grub
and add
vga=792 in this lineGRUB_CMDLINE_LINUX="crashkernel=auto rhgb quiet vga=792"
Save, then type
grub2-mkconfig -o /boot/grub2/grub.cfg
reboot
Start web server and configure to start on boot:
sudo systemctl start httpd
sudo systemctl enable httpd
Open firewall for web access:
sudo firewall-cmd --add-service=http --permanent
sudo firewall-cmd --add-service=https --permanent
sudo systemctl restart firewalld
Verify web server is running, by visiting this link in a browser: http://172.16.1.123. A test page should appear.
Create web page to verify PHP is running, by creating a file:
sudo vi /var/www/html/pinfo.php
that contains:
<?php
echo 'Current PHP info: ' . phpinfo();
?>
Visit this link in a browser: http://172.16.1.123/pinfo.php. A PHP status page should appear.
Set up DAViCal
DAViCal is the project that handles calendars and addressbooks.
DAViCal requires the PostgreSQL database. Install, initialize, and start it:
sudo yum install postgresql postgresql-server php-pgsql perl-YAML postgresql-devel perl-DBD-Pg

sudo postgresql-setup initdb

sudo systemctl start postgresql
sudo systemctl enable postgresql
Check status of PostgreSQL:
systemctl status postgresql
Edit the PostgreSQL config file to allow for access from DAViCal:
sudo vi /var/lib/pgsql/data/pg_hba.conf
Enter these lines at the top:
local   davical    davical_app   trust
local   davical    davical_dba   trust
Then, restart PostgreSQL:
sudo systemctl restart postgresql
Download latest DAViCal files:
cd ~
git clone https://gitlab.com/davical-project/davical.git
git clone https://gitlab.com/davical-project/awl.git
Remove unneeded git files:
rm -rf ./davical/.git/
rm -rf ./awl/.git/
Copy the DAViCal files:
sudo mv davical/ /usr/share/
sudo mv awl/ /usr/share/
Set the user to root, change permissions:
su -
chown -R root:apache /usr/share/davical
cd /usr/share/davical/
find ./ -type d -exec chmod u=rwx,g=rx,o=rx '{}' \;
find ./ -type f -exec chmod u=rw,g=r,o=r '{}' \;

chown -R root:apache /usr/share/awl
cd /usr/share/awl/
find ./ -type d -exec chmod u=rwx,g=rx,o=rx '{}' \;
find ./ -type f -exec chmod u=rw,g=r,o=r '{}' \;

chmod +x /usr/share/davical/dba/create-database.sh
chmod +x /usr/share/davical/dba/update-davical-database
Run the script to initialize the database, then exit from the root user:
cd /usr/share/davical/dba/
su postgres -c ./create-database.sh
exit
Note the output from the create-database.sh script. In particular, save the information from the line that looks similar to this; it will be needed later.
* The password for the 'admin' user has been set to 'G7GdvtdC'
Create an apache .conf file to allow the DAViCal files to run:
sudo vi /etc/httpd/conf.d/davical.conf
Enter this text and save:
Alias /davical /usr/share/davical/htdocs
<Directory /usr/share/davical/htdocs/>
    Require all granted
</Directory>
If SELinux is active, the security context of these files MUST be modified, or else they will not work. To find out the current SELinux mode, enter:
getenforce
If the answer is "Enforcing," then SELinux is fully active.
sudo vi /etc/sysconfig/selinux
Change the value of SELINUX to be
SELINUX=disabled
and then reboot:
sudo reboot
Otherwise, continue and change the security context of the specified files as follows:
Allow access to davical.conf under SELinux:
sudo chcon -t httpd_config_t /etc/httpd/conf.d/davical.conf
Allow access to davical and awl files:
sudo chcon -R -t httpd_sys_content_t /usr/share/davical
sudo chcon -R -t httpd_sys_content_t /usr/share/awl
Finally, restart Apache:
sudo systemctl restart httpd
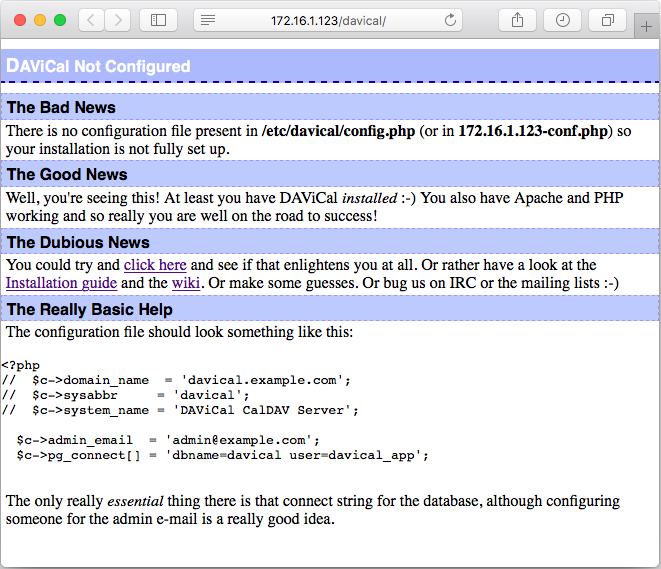
If all goes well, then visting this link
http://172.16.1.123/davical
should produce a screen that looks like this:
- Apache fails to restart.
- "Forbidden: You don't have permission to access /davical on this server."
- Blank screen.
- "Could not find the AWL libraries. Are they installed? Check your include_path in php.ini!"
Create the DAViCal configuration file:
sudo mkdir /etc/davical
sudo vi /etc/davical/config.php
Enter text and save:
<?php
//  $c->domain_name  = 'davical.example.com';
//  $c->sysabbr     = 'davical';
//  $c->system_name = 'DAViCal CalDAV Server';

  $c->admin_email  = 'admin@[172.16.1.123]';
  $c->pg_connect[] = 'dbname=davical user=davical_app';
To prevent an endless sequence of messages like this in /var/log/httpd/error_log:
PHP Warning: date(): It is not safe to rely on the system's timezone settings. You are *required* to use the date.timezone setting or the date_default_timezone_set() function. In case you used any of those methods and you are still getting this warning, you most likely misspelled the timezone identifier. We selected the timezone 'UTC' for now, but please set date.timezone to select your timezone. in /usr/share/davical/htdocs/always.php on line 107
Edit this file:
sudo vi /etc/php.ini
Find the line containing date.timezone. Uncomment it (i.e., remove the leading ';') and change it to include the correct time zone:
date.timezone = 'America/Los_Angeles'
Set server name by editing this file:
sudo vi /etc/httpd/conf/httpd.conf
Find the line containing ServerName. Add a line after it:
ServerName 172.16.1.123:80
Verify that Apache is set up correctly. (The response should be "Syntax OK.")
sudo apachectl configtest
Restart Apache:
sudo systemctl restart httpd
It should now be possible to log in at http://172.16.1.123/davical/ with the user name 'admin' and the password previously noted in the output from create-database.sh (see above).
If this produces a blank screen, it may be SELinux acting up again. See if PostgreSQL is still running:
systemctl status postgresql
If it isn't, try temporarily disabling SELinux and restarting PostgreSQL:
sudo setenforce 0
sudo systemctl restart postgresql
sudo setenforce 1
If that doesn't help, insight may be gained from inspecting logs:
sudo tail /var/log/httpd/error_log
sudo tail /var/log/audit/audit.log
If SELinux is still causing problems, it may be simplest to just turn it off.
Set up SSL
Instructions have changed. See New self-signed SSL Certificate for iOS 13 for important compatibility information.
For the latest versions of iOS and macOS Calendar and Contacts apps, SSL appears to be required. (This is in spite of the fact that those apps have a "SSL on/off" option when adding a new account.)
The following instructions are based on the information provided in the article "How To Create an SSL Certificate on Apache for CentOS 7".
Make sure mod_ssl is installed:
sudo yum install mod_ssl
Generate a certificate:
sudo mkdir /etc/ssl/private
sudo chmod 700 /etc/ssl/private
sudo openssl req -x509 -nodes -days 3650 -newkey rsa:2048 -keyout /etc/ssl/private/apache-selfsigned.key -out /etc/ssl/certs/apache-selfsigned.crt
For Common Name use the IP address of the VM:
Common Name (eg, your name or your server's hostname) []:172.16.1.123
Next:
sudo openssl dhparam -out /etc/ssl/certs/dhparam.pem 2048
cat /etc/ssl/certs/dhparam.pem | sudo tee -a /etc/ssl/certs/apache-selfsigned.crt
Set up Apache
Edit ssl.conf:
sudo vi /etc/httpd/conf.d/ssl.conf
Make the following changes, commenting out and editing as needed, and save:
<VirtualHost _default_:443>
# General setup for the virtual host, inherited from global configuration
DocumentRoot "/var/www/html"
ServerName 172.16.1.123:443

# SSLProtocol all -SSLv2

# SSLCipherSuite HIGH:MEDIUM:!aNULL:!MD5:!SEED:!IDEA

# SSLCertificateFile /etc/pki/tls/certs/localhost.crt
SSLCertificateFile /etc/ssl/certs/apache-selfsigned.crt

# SSLCertificateKeyFile /etc/pki/tls/private/localhost.key
SSLCertificateKeyFile /etc/ssl/private/apache-selfsigned.key
</VirtualHost>

# Begin copied text
# from https://cipherli.st/
# and https://raymii.org/s/tutorials/Strong_SSL_Security_On_Apache2.html

SSLCipherSuite EECDH+AESGCM:EDH+AESGCM:AES256+EECDH:AES256+EDH
SSLProtocol All -SSLv2 -SSLv3
SSLHonorCipherOrder On

# Disable preloading HSTS for now.  You can use the commented out header line that includes
# the "preload" directive if you understand the implications.

#Header always set Strict-Transport-Security "max-age=63072000; includeSubdomains; preload"

Header always set Strict-Transport-Security "max-age=63072000; includeSubdomains"
Header always set X-Frame-Options DENY
Header always set X-Content-Type-Options nosniff

# Requires Apache >= 2.4

SSLCompression off
SSLUseStapling on
SSLStaplingCache "shmcb:logs/stapling-cache(150000)"

# Requires Apache >= 2.4.11
# SSLSessionTickets Off
Restart Apache:
sudo systemctl restart httpd
Verify SSL is on by visiting link: https://172.16.1.123
Note: Your browser will be distressed because this uses a self-generated SSL cert. Reassure your browser that this time it's OK.
Set up calendar and contacts clients
Create DAViCal accounts
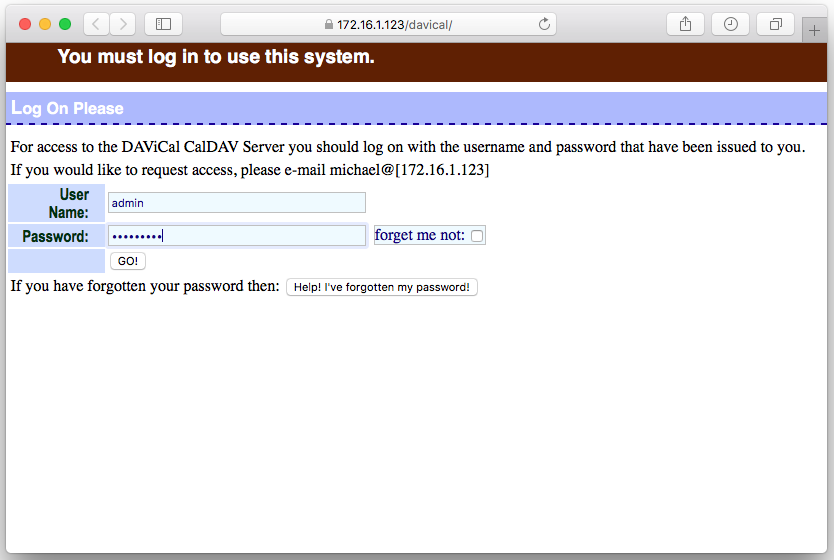
Log in to DAViCal at https://172.16.1.123/davical with user name 'admin' and the previously-noted password.
To change the admin password to something more memorable:
- Choose View My Details from the User Functions menu.
- Enter the new password in the Change Password field.
- Re-enter the new password in the Confirm Password field.
- Click the Apply Changes button.
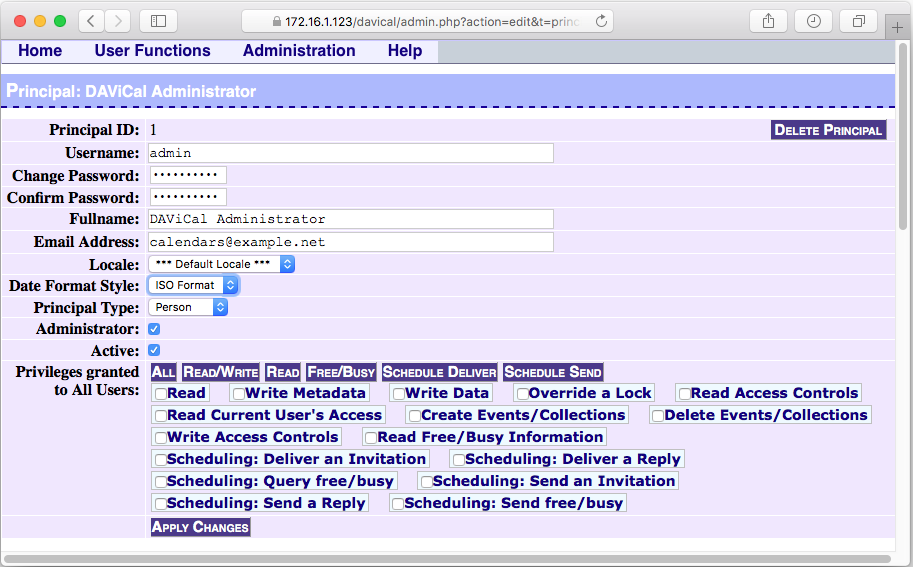
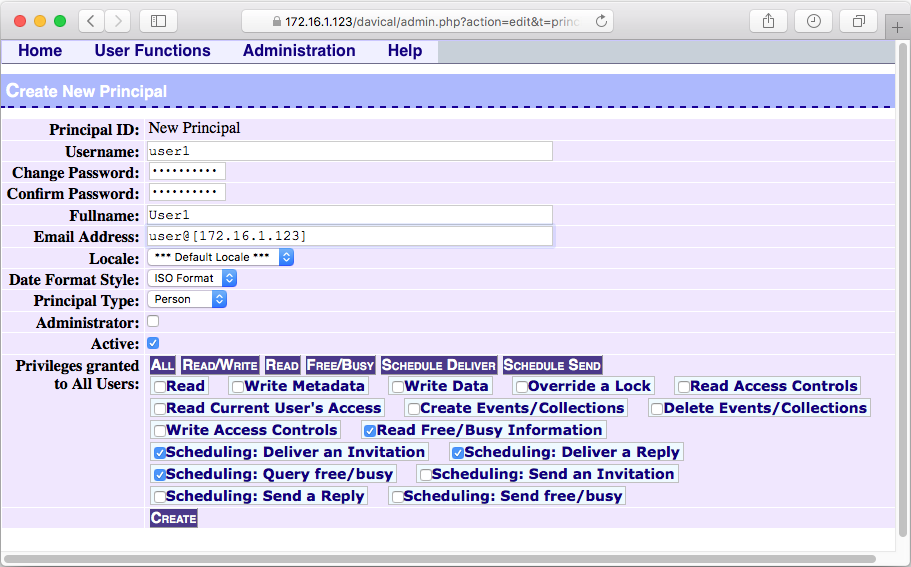
To add a new user:
- Choose Create Principal from the User Functions menu.
- Enter values for the Username, Change Password, Confirm Password, and Fullname fields.
- Choose desired Date Format Style.
- Click the Create button.
Allow self-signed certificate
Important: Before attempting to connect to the new server from a Mac for the first time, visit https://172.16.1.123 and reassure your system that it is OK to connect to the server, even though it is using a self-signed certificate. If you do not do this first, you will not be able to complete the following steps.
For example, on Safari you will first see this:
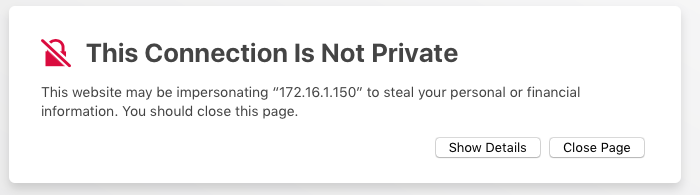
Click Show Details, and then you will see this:

Click the link that says, "Visit this website," and then you will see this:
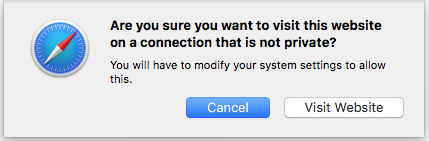
Then click Visit Website and you will see this:
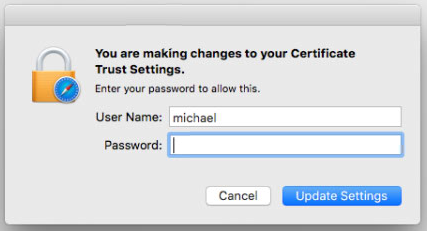
Then enter your password and click Update Settings.
Create macOS accounts
Connect calendar account on Mac:
- Open Systems Preferences.
- Choose the Internet Accounts pane.
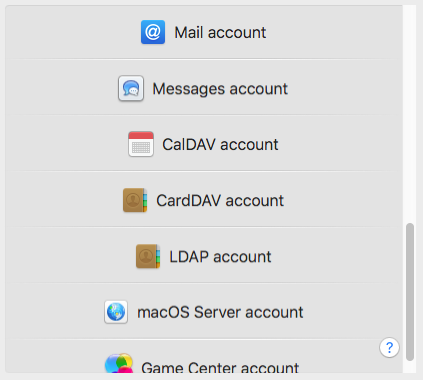
- In the right section of the pane, at the bottom of the list, Click "Add Other Account..."
- Click "CalDAV account."
- Choose Advanced for the Account Type, and fill out the fields as follows (substituting for "user1" and "user1pwd" as appropriate):
  Account Type: Advanced
     User Name: user1
      Password: user1pwd
Server Address: 172.16.1.123
   Server Path: /davical/caldav.php/user1/calendar/
          Port: 443
                ✔ Use SSL
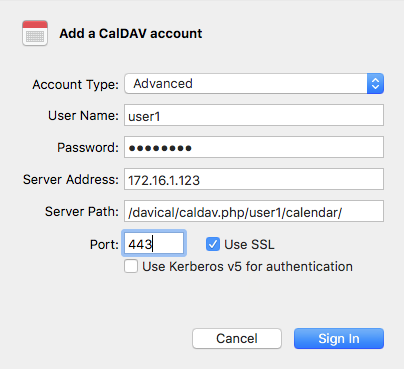
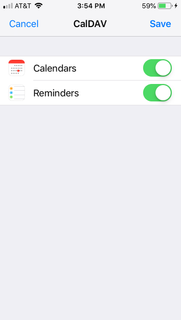
- Click Sign In.
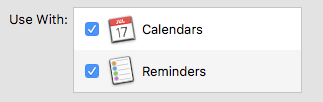
- After signing in, make sure both Calendar and Reminders are checked.
Connect contacts account on Mac:
- Open Systems Preferences.
- Choose the Internet Accounts pane.
- In the right section of the pane, at the bottom of the list, Click "Add Other Account..."
- Click "CardDAV account."
- Choose Advanced for the Account Type, and fill out the fields as follows (substituting for "user1" and "user1pwd" as appropriate):
  Account Type: Advanced
     User Name: user1
      Password: user1pwd
Server Address: 172.16.1.123
   Server Path: /davical/caldav.php/user1/addresses/
          Port: 443
                ✔ Use SSL
(Note that the server path still containscaldav.phpeven though we are now connecting a CardDAV account.)
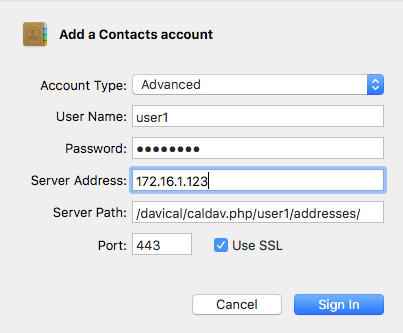
- Click Sign In.
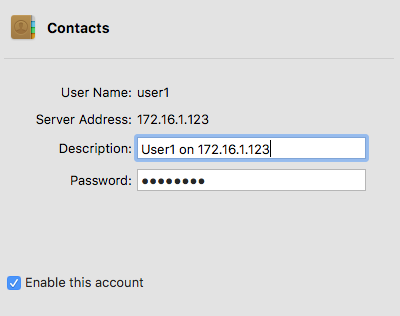
- After signing in, optionally change the description to something more concise or descriptive.
Create iOS accounts
Connect calendar account on iPhone / iOS device:
- Open Settings.
- Tap Passwords & Accounts.
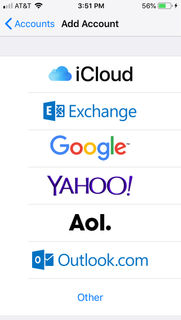
- Scroll to bottom and tap Add Account.
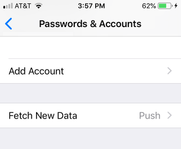
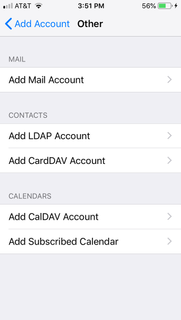
- Tap Other.
- Tap Add CalDAV Account.
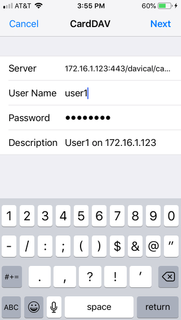
- Fill out the fields as follows (substituting for "user1" and "user1pwd" as appropriate):
     Server: 172.16.1.123:443/davical/caldav.php/user1/calendar/
  User Name: user1
   Password: user1pwd
Description: User1 on 172.16.1.123

- Click Next.
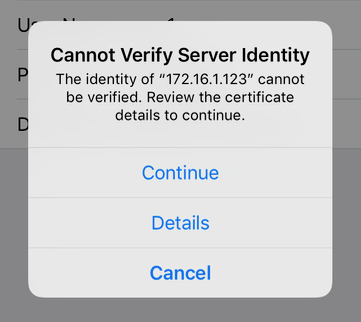
- If necessary, click Continue to accept certificate.
- Make sure both Calendar and Reminders are on.
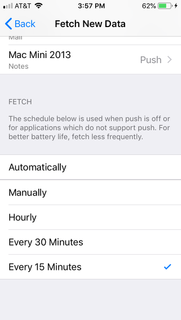
There will be a delay until the new calendar account appears in the calendar app. To reduce the delay to a minimum (15 minutes):
- Open Settings.
- Tap Passwords & Accounts.
- Scroll to bottom and tap Fetch New Data.
- At the bottom of the screen, tap Every 15 Minutes.
Connect contacts account on iPhone / iOS device:
- Open Settings.
- Tap Passwords & Accounts.
- Scroll to bottom and tap Add Account.
- Tap Other.
- Tap Add CardDAV Account.
- Fill out the fields as follows (substituting for "user1" and "user1pwd" as appropriate):
     Server: 172.16.1.123:443/davical/caldav.php/user1/addresses/
  User Name: user1
   Password: user1pwd
Description: User1 on 172.16.1.123
- Click Next.
Set up email server
Note: Shared notes in the Notes apps on macOS and iOS work via an email server.
Install software:
sudo yum install postfix dovecot mailx
Edit hosts file:
sudo vi /etc/hosts
and add this line:
172.16.1.123 localhost localhost.localdomain localhost4 localhost4.localdomain4
Configure dovecot by editing this file
sudo vi /etc/dovecot/conf.d/15-lda.conf
and changing this line:
postmaster_address = admin@[172.16.1.123]
and adding these lines at the bottom:
lda_mailbox_autocreate = yes
lda_mailbox_autosubscribe = yes
and editing this file
sudo vi /etc/dovecot/conf.d/10-mail.conf
and changing this line:
mail_location = maildir:~/Maildir
and editing this file
sudo vi /etc/dovecot/conf.d/10-ssl.conf
and changing these lines (don't forget the unmatched '<' before each path):
ssl = required
ssl_cert = </etc/ssl/certs/apache-selfsigned.crt
ssl_key = </etc/ssl/private/apache-selfsigned.key
Configure postfix by editing this file
sudo vi /etc/postfix/main.cf
and changing these lines:
myorigin = [172.16.1.123]
inet_interfaces = localhost, 172.16.1.123
mydestination = $myhostname, localhost.$mydomain, localhost, [172.16.1.123]
mynetworks = 172.16.1.0/24
mailbox_command = /usr/libexec/dovecot/deliver
smtpd_banner = [172.16.1.123]
If SELinux is still active, it may cause problems at this point. Temporarily disable it:
sudo setenforce 0
Start servers and enable automatic start on boot
sudo systemctl restart postfix
sudo systemctl enable postfix
sudo systemctl restart dovecot
sudo systemctl enable dovecot
Re-enable SELinux, if desired:
sudo setenforce 1
Open firewall ports:
sudo firewall-cmd --permanent --add-service=smtp
sudo firewall-cmd --permanent --add-service=pop3
sudo firewall-cmd --permanent --add-service=imap
sudo firewall-cmd --permanent --add-service=smtps
sudo firewall-cmd --permanent --add-service=pop3s
sudo firewall-cmd --permanent --add-service=imaps

sudo systemctl restart firewalld
Configure mail-reading program by setting this parameter:
MAIL=~/Maildir
Make it permanent by editing this file:
vi .bashrc
Add line and save:
MAIL=~/Maildir
sudo vi /etc/profile.d/mail.sh
and inserting this:
MAIL=~/Maildir
Try sending mail to self:
echo "Test One" | mail -s "testmail" admin@[172.16.1.123]
Try reading mail:
mail
To read a message, type its number. To quit, type 'q'.
If there are problems, it may help to examine the mail log:
tail /var/log/maillog
Set up email accounts
As configured above, the way to add email users is to add users to the CentOS system:
sudo useradd user1
sudo passwd user1

sudo useradd user2
sudo passwd user2

# etc.
Note that these are entirely separate from the DAViCal accounts created above, which can have different passwords.
Set up email clients
Add email account on Mac:
- Open Systems Preferences.
- Choose the Internet Accounts pane.
- In the right section of the pane, at the bottom of the list, Click "Add Other Account..."
- Click "Mail account."
- Fill out the fields as follows (substituting for "user1" and "user1pwd" as appropriate):
         Name: user1
Email Address: user1@[172.16.1.123]
     Password: user1pwd
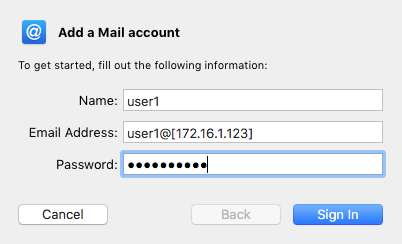
- Click Sign In. A new dialog will appear, with the message "Unable to verify account name or password" at the bottom.
- Fill out the next set of fields as follows:
       Email Address: user1@[172.16.1.123]
           User Name:
            Password: user1pwd
        Account Type: IMAP
Incoming mail Server: 172.16.1.123
Outgoing Mail Server: 172.16.1.123
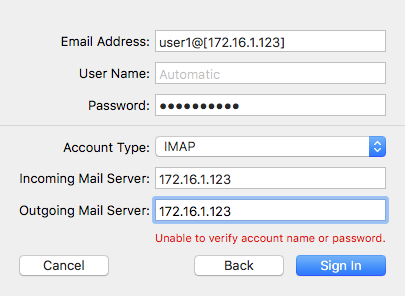
- Click Sign In. (It may spin the busy icon for a while.)
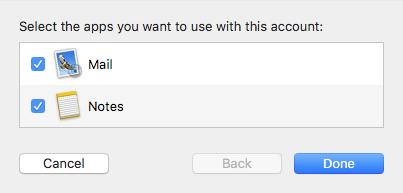
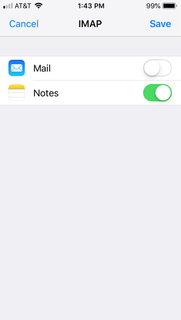
- After signing in, make sure both Mail and Notes are checked.
The first time you send a message from macOS Mail to an address on the VM, you may see an alert like this:
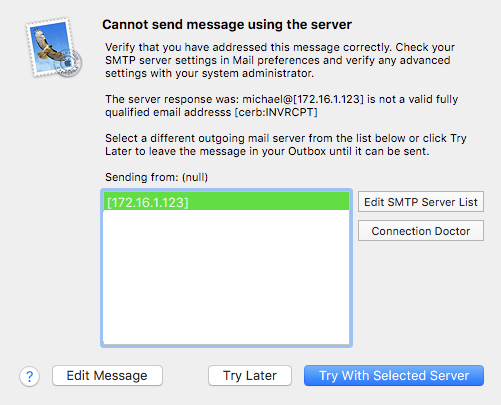
The mail will be sent once you select the VM server and click Try With Selected Server.
Add email account on iPhone / iOS device:
- Open Settings.
- Tap Passwords & Accounts.
- Scroll to bottom and tap Add Account.
- Tap Other.
- Tap Add Mail Account.
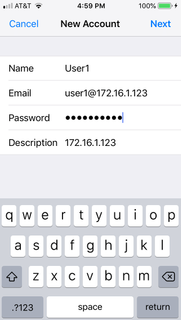
- Fill out the New Account screen as follows. iOS appears not to accept the correct form
of the email address (user1@[172.16.1.123]), so enter
it as shown. Note that the password should be that of the corresponding CentOS account, not the
DAViCal password. Tap Next when done.
       Name: User1
      Email: user1@172.16.1.123
   Password: passu1pass
Description: 172.16.1.123
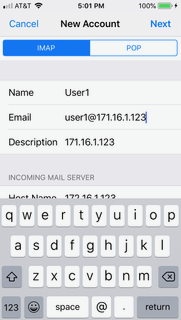
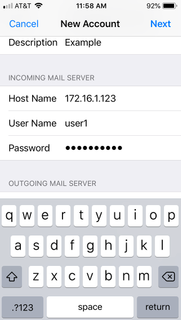
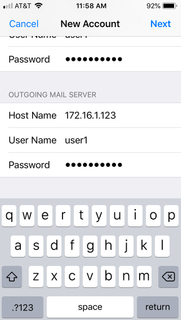
- The next screen has three parts. The values for the first part are carried over from
the previous screen. Fill out the others as shown. Tap Next when done.
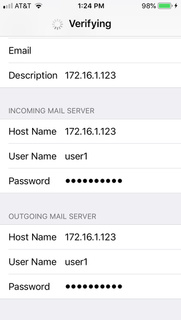
       Name: User1
      Email: user1@172.16.1.123
   Password: passu1pass
Description: 172.16.1.123

INCOMING MAIL SERVER
  Host Name: 172.16.1.123
  User Name: user1
   Password: passu1pass

OUTGOING MAIL SERVER
  Host Name: 172.16.1.123
  User Name: user1
   Password: passu1pass
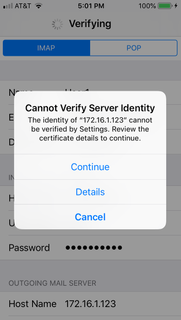
- An alert stating "Cannot Verify Server Identity" may appear; if so, tap Continue.
- The busy icon and "Verifying" will appear at the top of the screen for a while.
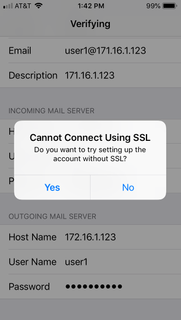
This may be followed by an alert stating, "Cannot Connect Using SSL." When asked
if you want to continue without SSL, tap No.
- Tap Next again.
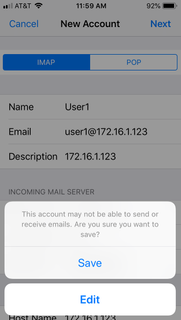
- This may be followed by an alert warning that the account may not be able to send or
receive email. When asked if you are sure you want to save, tap Save.
- At the last screen, turn off Mail and turn on Notes, then tap Save:
user1@[172.16.1.123] don't seem to work with the iOS Settings or Mail apps.A solution could be to use a fully-qualified domain name for the server instead of an IP address in configuring all of the above services. The most complete way to do this would involve running a local DNS server. A less involved solution might be to install and use Avahi (a zeroconf or Bonjour-compatible service) to provide a usable domain name for the VM, by using a procedure like this:
sudo yum install avahi

sudo hostnamectl set-hostname myserver

sudo firewall-cmd --add-port=5353/udp --permanent
sudo systemctl restart firewalld

sudo systemctl start avahi-daemon
sudo systemctl enable avahi-daemon
The system could then be addressed from local macOS or iOS systems as
myserver.local, e.g.:ping myserver.local
Scripts to start and stop server system
It is convenient to have icons on the macOS Desktop that will start and stop the VM simply by double-clicking them.
First, install and enable acpid so that the VM can handle a simulated press of the power button and perform a graceful shutdown:
sudo yum install acpid
sudo systemctl start acpid
sudo systemctl enable acpid
sudo systemctl status acpid
Then, shut down the VM:
sudo poweroff
On the server Mac, create a script to start the VM.
cd ~/Desktop
vi startVM
Insert this text. "Headless" means the VirtualBox and VM windows will not be visible.
/usr/local/bin/VBoxManage startvm "CentOS 7" --type headless
Create a script to stop the VM:.
vi shutdownVM
Insert this text.
/usr/local/bin/VBoxManage controlvm "CentOS 7" acpipowerbutton
Make the scripts executable.
chmod +x startVM
chmod +x shutdownVM
LaunchAgent to start and stop server
Ideally, the virtual server would start automatically when the Mac server is booted, and it would shutdown cleanly when the Mac is shutdown or restarted.
Theoretically, this should be possible by creating the appropriate LaunchDaemon. In practice, while such a daemon can be configured to automatically start the VM, it was problematic to try to get the VM to be shut down cleanly when the Mac is shut down. I was unable to get that part working; it seems as if during the course of the shutdown operation, some of the necessary system capabilities are gone before the command to close the VM can be handled.
As an alternative, it is possible to create a LaunchAgent that starts the VM when a particular user logs in and exits when that user logs out, including when the user is automatically logged out as a result of a shutdown or restart. When this is combined with a configuration that automatically logs in a particular user on boot, then the desired behavior occurs.
The following steps (on the Mac, not on the virtual server) create a LaunchAgent for user "michael," which will automatically start the VM on login, and do a clean shutdown on logout:
Make directory and create the plist file:
mkdir ~/Library/LaunchAgents
vi ~/Library/LaunchAgents/org.7402.server.plist
and insert the following text:
<?xml version="1.0" encoding="UTF-8"?>
<!DOCTYPE plist PUBLIC "-//Apple//DTD PLIST 1.0//EN" "http://www.apple.com/DTDs/PropertyList-1.0.dtd">
<plist version="1.0">
<dict>
    <key>Disabled</key>
    <false/>
    <key>Label</key>
    <string>org.7402.server</string>
    <key>ProgramArguments</key>
    <array>
    <string>/Users/michael/agent/org.7402.server</string>
    </array>
    <key>RunAtLoad</key>
    <true/>
    <key>LaunchOnlyOnce</key>
    <true/>
    <key>ExitTimeOut</key>
    <integer>30</integer>
</dict>
</plist>
Make directory and create the script file:
mkdir ~/agent
vi ~/agent/org.7402.server
and insert the following text:
#!/bin/bash
# uncomment "echo" statements to debug or log

# echo # >> ~/agent/org.7402.test.log
# echo "Start PID =" $$ `date` # >> ~/agent/org.7402.test.log

# Startup work here
/usr/local/bin/VBoxManage startvm 'CentOS 7' --type headless

# echo "attempted VBoxManage startvm" # >> ~/agent/org.7402.test.log

function finish()
{
    # echo "SIGTERM PID =" $$ `date` # >> ~/agent/org.7402.test.log

    # Shutdown work here
    /usr/local/bin/VBoxManage controlvm 'CentOS 7' acpipowerbutton

    # echo "attempted VBoxManage controlvm" # >> ~/agent/org.7402.test.log

    # wait forever (until SIGKILL)

    # don't use "exit 0" here, which would kill VM immediately
    read < ~/agent/vboxfifo
}

trap finish TERM

rm -f ~/agent/vboxfifo
mkfifo ~/agent/vboxfifo

# wait forever (until SIGTERM)

# idiom to pause script; don't use "sleep" here - it won't work
read < ~/agent/vboxfifo

# echo "Stop"
Make the script executable:
chmod +x ~/agent/org.7402.server
Data Migration
To save an existing calendar as a disk file:
- Launch the Calendar app.
- If your calendars are not listed on the left side of the window,
click the Calendars button at the top of the window to show them.

- Select a calendar.
- In the File menu, choose Export > Export...
- Enter a filename.
To upload a calendar to DAViCal:
- Visit
https://172.16.1.123/davical and log in to the DAViCal admin account
- In the User Functions menu, choose List Users:
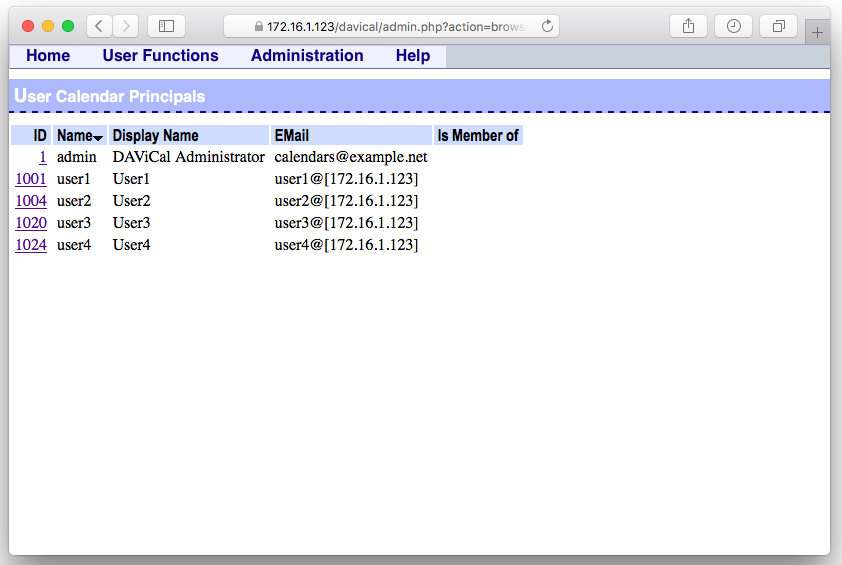
- Click the ID number for the user who owns the calendar, to open the properties page for that user.
Scroll down to the section named Principal Collections

- Click the Create Collection button to open the Create New Collection window:
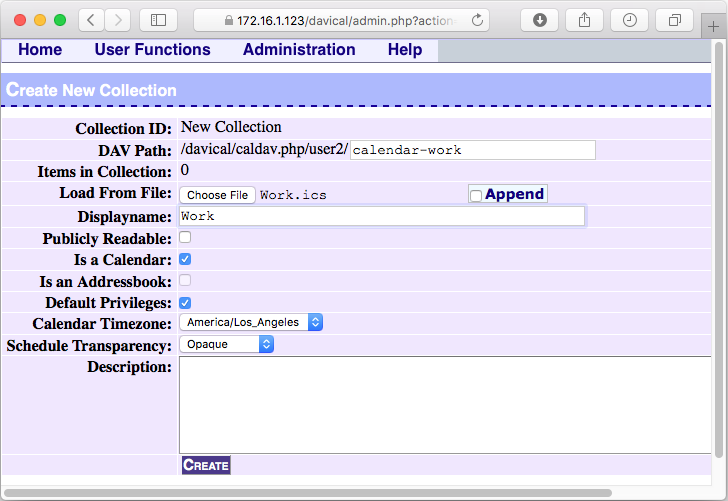
- In the DAV Path field, enter a name to be used in the path for the new calendar.
- Click the Choose File button, and select the
.icsfile to be uploaded. - In the Displayname field, enter the name to be displayed for the calendar.
- Make sure the checkboxes are checked and unchecked as shown.
- Adjust the Calendar Timezone.
- Click the Create button.
Repeat for each calendar to be uploaded.
To move contacts from one server to another:
- On Mac, launch the Contacts app
- In the contacts list (center column), select the contacts to be moved.
- In the File menu, choose Export > Export vCard...
- Save the contacts to a file (e.g., "All Contacts.vcf)"
- Note the name of each group to be moved.
- For each group (left column), right-click or Ctrl-click the group and choose Export Group vCard...
- Save each group to a file.
- In the Contacts menu, choose Preferences...
- Select the General icon. At the bottom of the window, next to Default Account, select the new server.
- Close the Preferences window.
- In the File menu, choose Import... and select the file containing all contacts. Click Open.
- Select the group named All 172.16.1.123 (left column). In the File menu, choose New Group and enter the name of a group to be moved.
- Repeat previous step for each group to be moved.
- On the desktop, locate the icon for one of the group vCard files. Drag it onto the name of the corresponding new group in the Contacts window.
- Repeat previous step for each group.
Sharing Calendars
To enable calendar sharing among users:
- Visit
https://172.16.1.123/davical and log in to the DAViCal admin account
- In the User Functions menu, choose List Users:
- Click one of the ID numbers for a non-admin user, to open the properties page for that user:
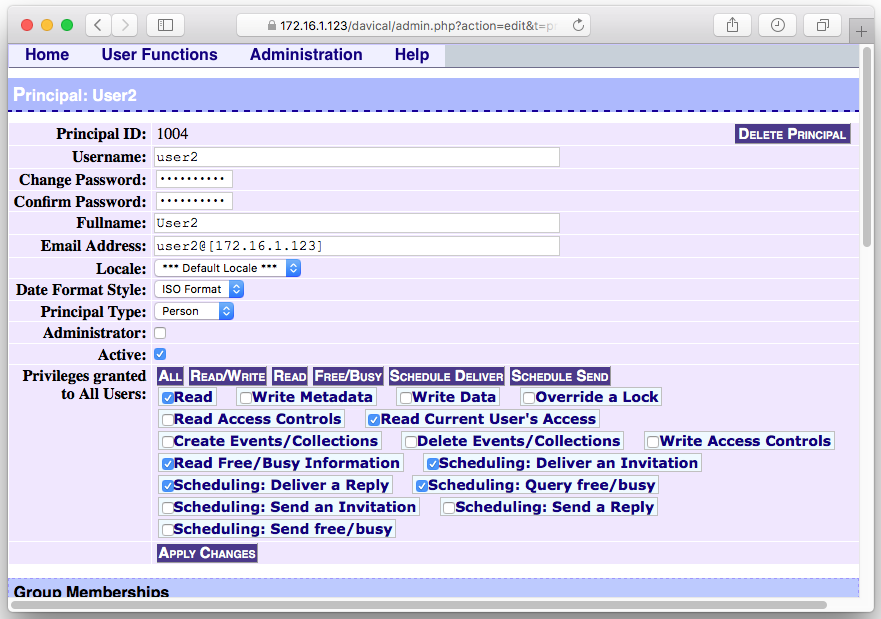
- Click the
 button to cause the appropriate boxes to be checked.
 - Click the
 button.
 - Repeat the above for each of the other users.
To subscribe to a shared calendar in the macOS Calendar app:
- Log in to the Macintosh of a user (e.g., User1).
- Launch the Calendar app.
- In the File menu, choose New Calendar Subscription...
- Enter the URL of the calendar of another DAViCal user (e.g. User2):
https://172.16.1.123/davical/caldav.php/user2/calendar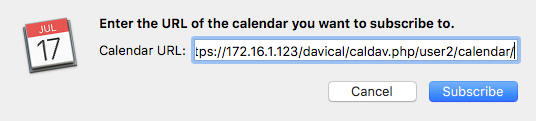
- Enter your DAViCal account information in the next dialog:

- Modify calendar color and auto-refresh time as desired:
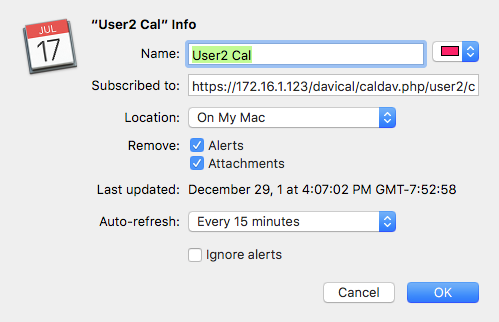
- Click OK.
- Repeat above for each additional calendar
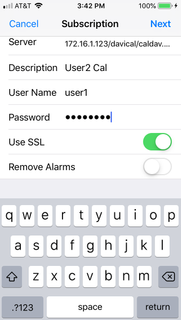
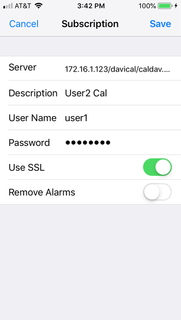
To subscribe to a shared calendar in the iOS Calendar app:
- Open Settings.
- Tap Passwords & Accounts.
- Scroll to bottom and tap Add Account.
- Tap Other.
- Tap Add Subscribed Calendar.
- Enter the URL of the calendar of another DAViCal user (e.g. User2), and tap Next.
https://172.16.1.123/davical/caldav.php/user2/calendar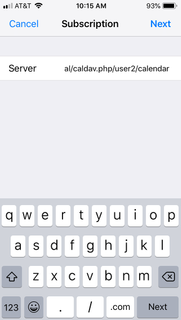
- Dismiss the alert by tapping OK.
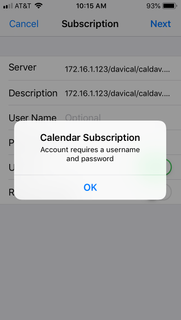
- Enter your user name (e.g., user1) and password. Modify the Description as desired. Tap Next.
- Tap Save.
- Repeat above for each additional calendar
To contact the author, send email.
-- Macworld 2013 | Sync contacts and calendars with your iPhone via iTunes? Not in Mavericks you don't