DIY Home Voice Assistant with Privacy and Air Quality Display
I was intrigued by those devices from Amazon, Google, and Apple that respond in useful ways to spoken commands, but I hate, hate, hated the idea of those boxes listening to what I said, sending my voice and other information about me to those cloud giants, and having to abandon control over things in my own house to external entities that way.
So I decided to see how far I could get with open source software to build my own offline self-contained version, that doesn't rely on an outside service to do the speech recognition. Here's what I've got. It actually works, although it doesn't compare to the commercial ones. I'd be happy to see what others could do along these lines.
Contents
- Overview
- Operation
- Commands
- Hardware Selection
- Software Selection
- Hardware Details
- Software Details
- Software Setup & Installation
Overview
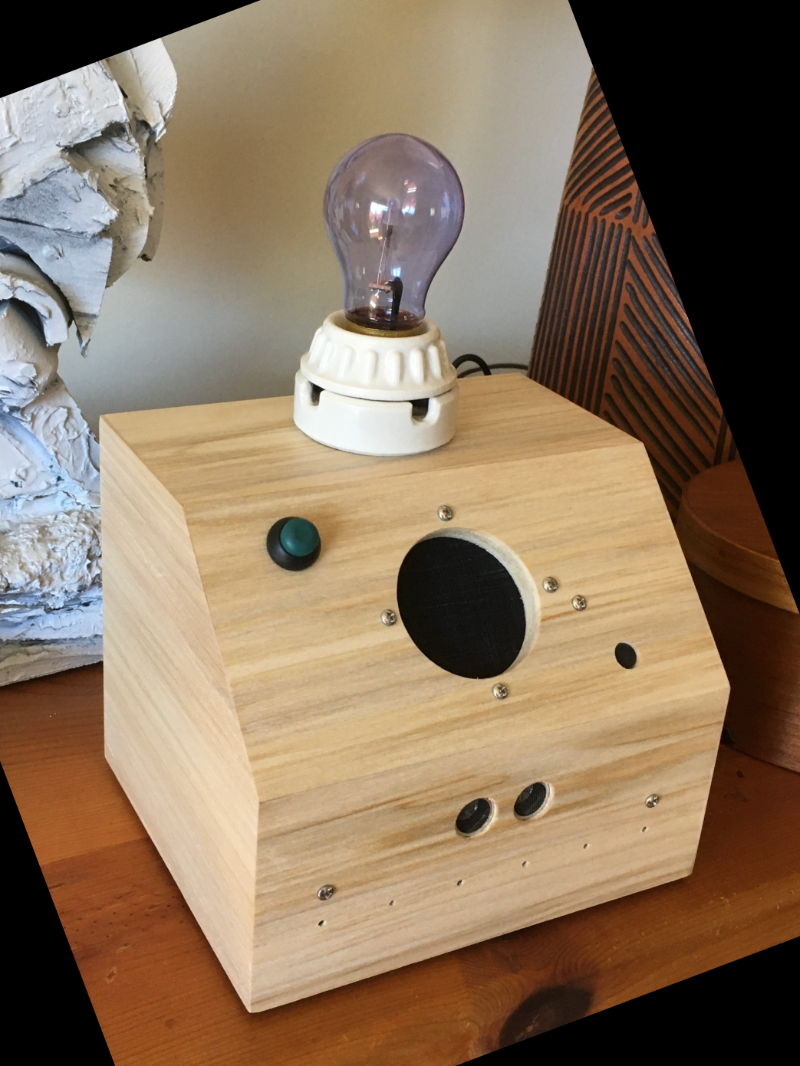
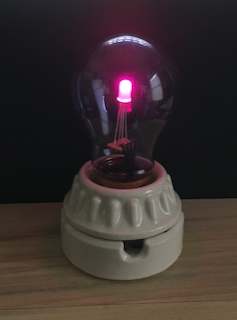
Here is the finished home-made object:
Besides the main goal mentioned above, I had these additional ones for the version 1.0 device:
- I wanted an ambient display that would show the outside air quality at my location, on voice command.
- I wanted it all to run on simple & inexpensive hardware in a small self-contained package.
To achieve those goals I was willing to accept the following restrictions:
- Limited vocabulary.
- Custom tuning of phrases for best recognition accuracy.
- Only respond to nearby speech.
In other words, this would be a personal device, rather than a generally useful one. The higher-powered commercial devices are definitely more fun to play with, and much more likely to impress any remaining friends or relations who have never seen one. This system, however, provides the satisfaction of building and using a functional device entirely under one's own control.
External components, from top to bottom:
- A small appliance bulb with filament removed and replaced by RGB LED.
- A pushbutton.
- A speaker.
- A microphone
- An ultrasonic distance sensor.
- A row of 6 small blue LEDs.
Here is a view of some of the internals.
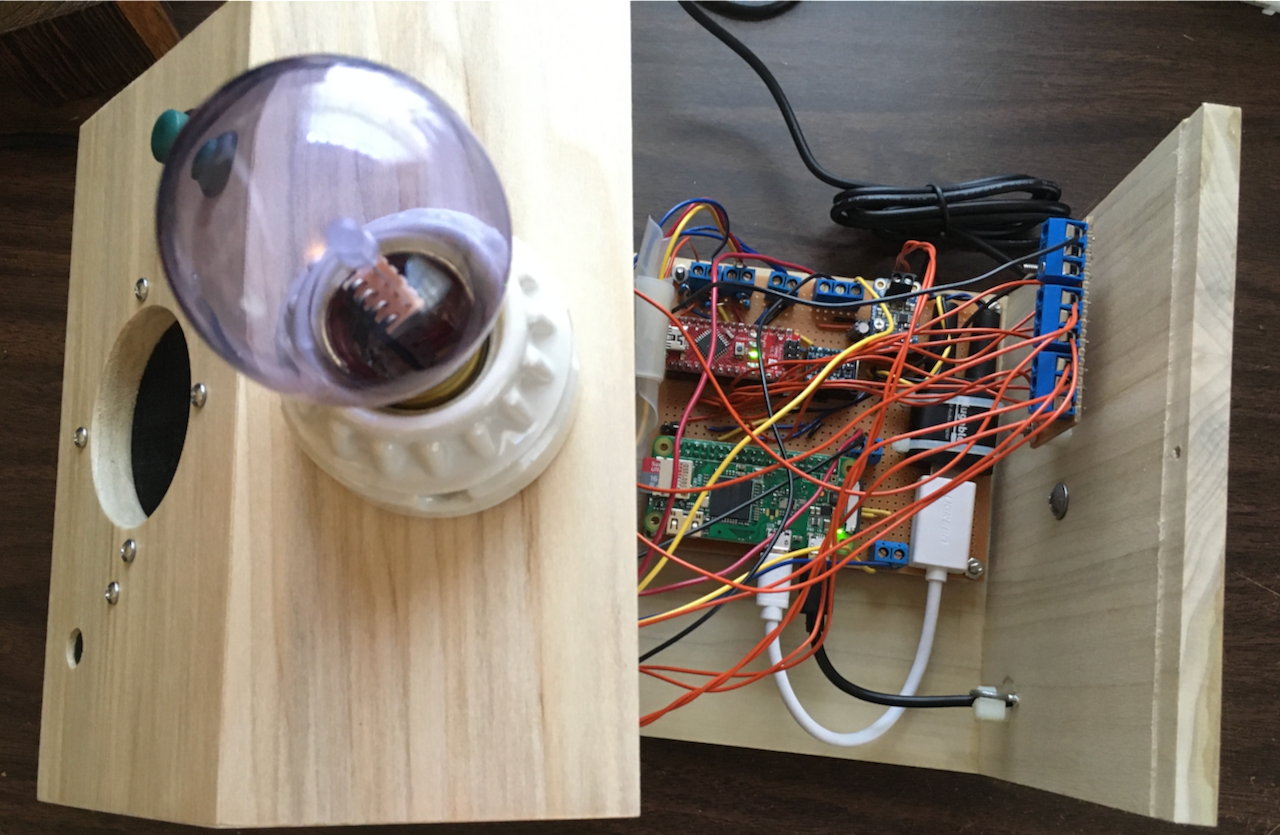
Most of the components are mounted on a piece of perfboard:
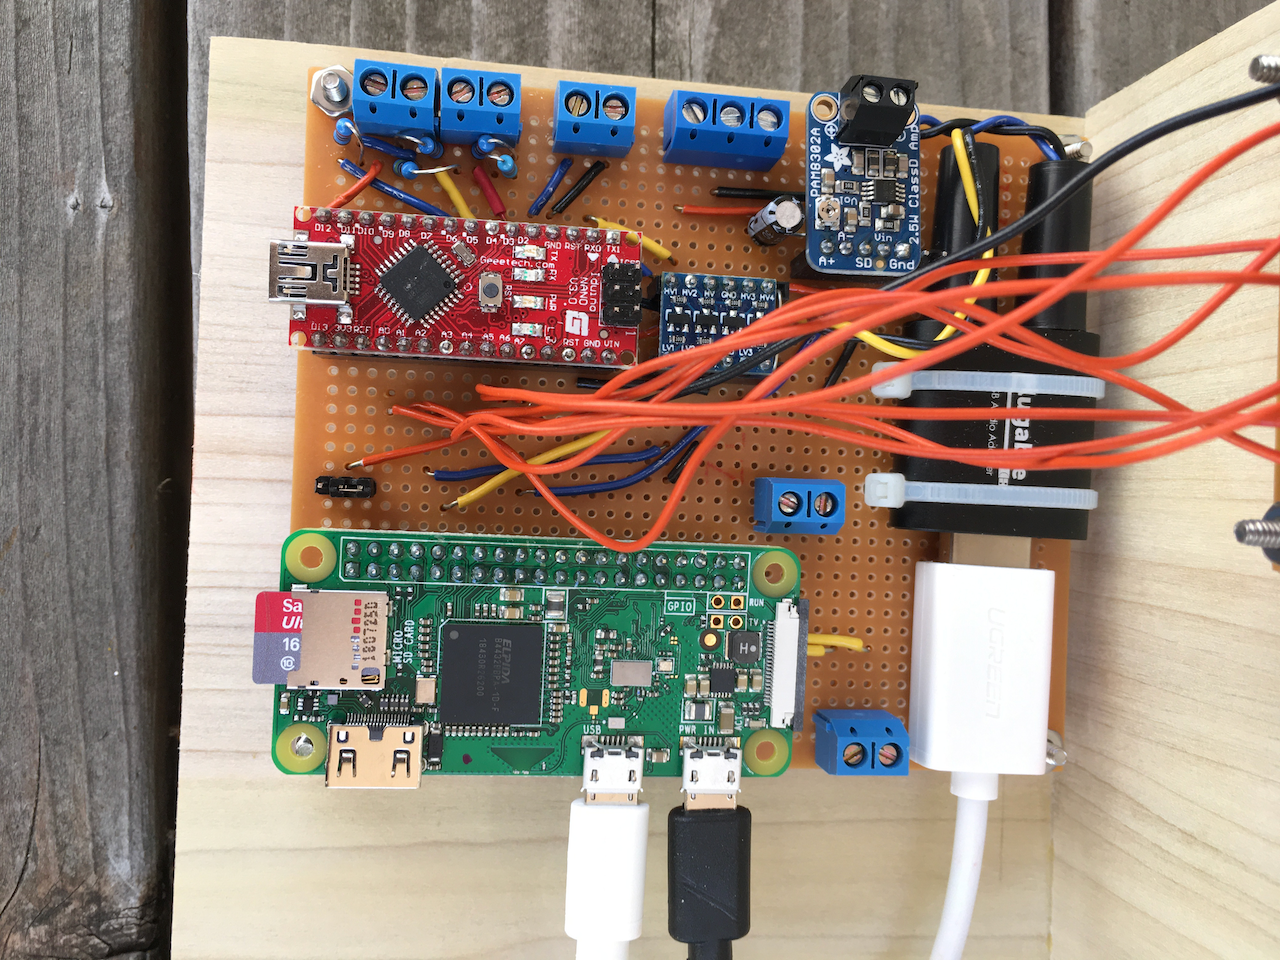
They include:
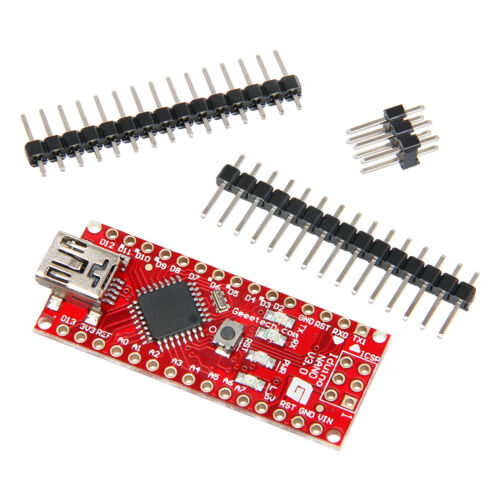
- Iduino Nano (Arduino clone).
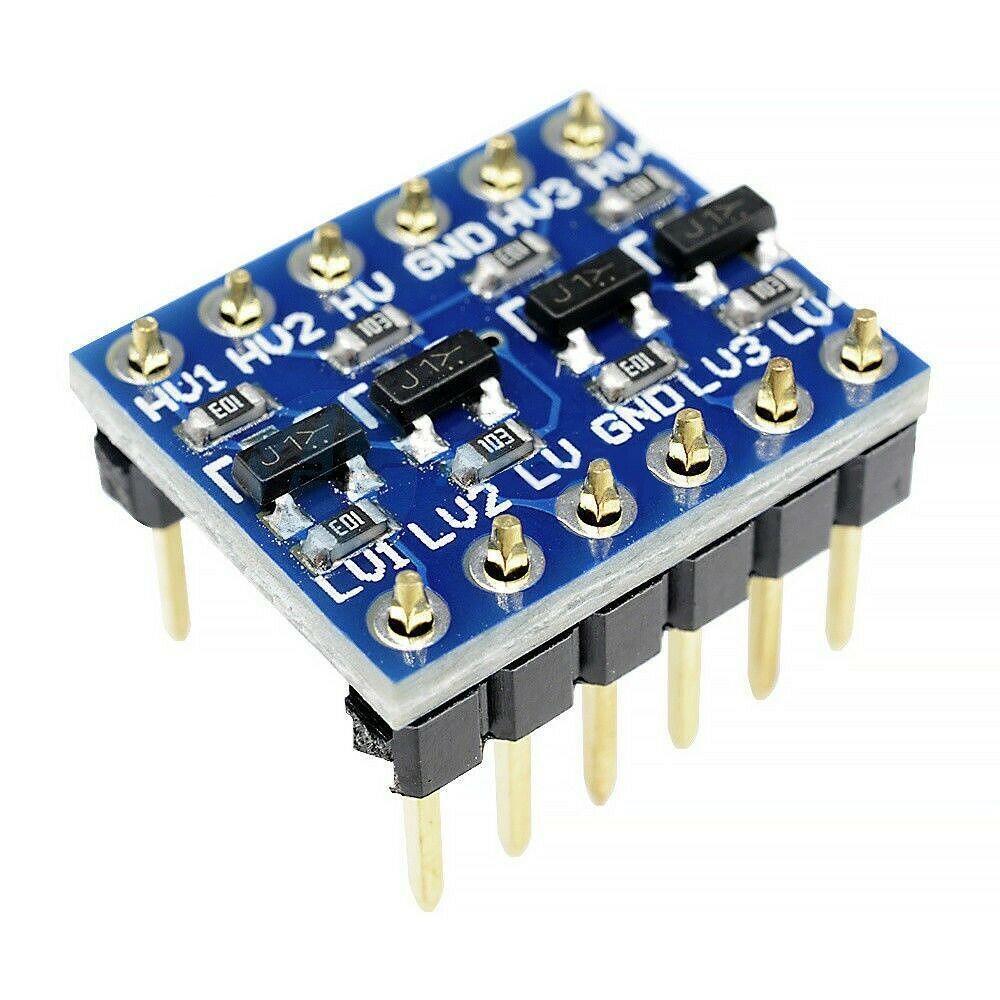
- Level shifter (5v to/from 3.3v).
- Mono speaker amplifier.
- USB Audio interface.
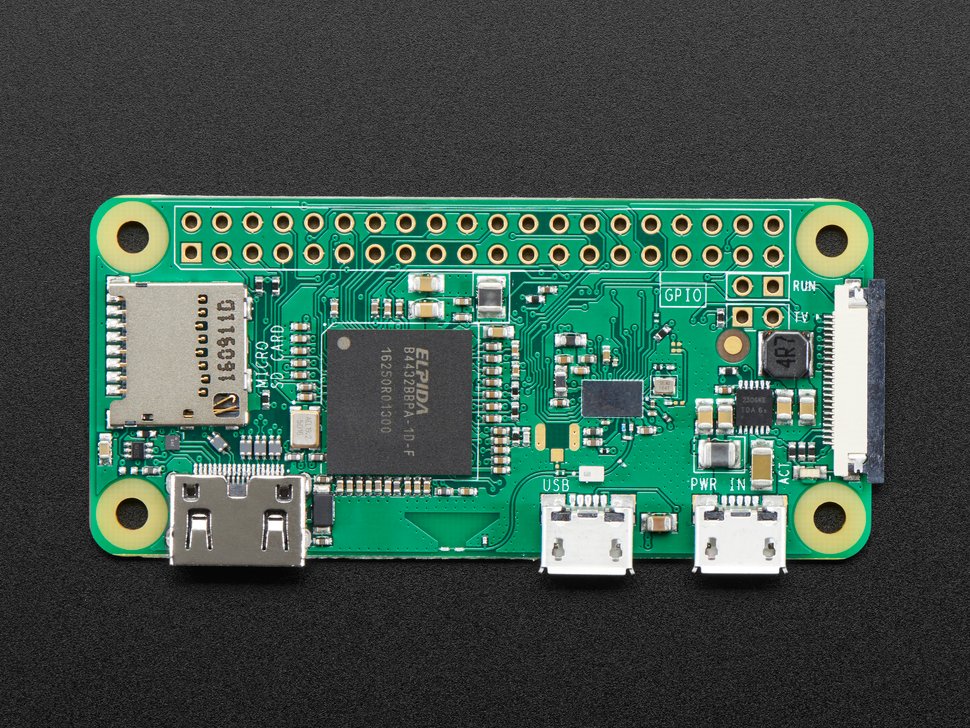
- Rasberry Pi Zero W.
Operation
- When the object (the "Lamp Box") detects something nearby, a pair of the blue LEDs will light up, beginning with the outer pair at about 125 cm (~4 feet).
- Approach within about 20-50 cm (~ 8-20 inches) of the front of the Lamp Box.
- Wait until the center two blue LEDs are lit, indicating that the Lamp Box is waiting to hear the "wake" word.
- Say, "Computer."
- Front lights blink, and the Lamp Box speaks a reply, e.g., "Working."
- Say one of the commands. (See next section.)
- Wait for response.
- The Lamp Box will go back to waiting for the "wake" word again after one of the following: the front button is pressed, the command "Sleep" is heard, or 20 seconds of silence occurs.
Unlike more sophisticated systems, the voice recognition code here is not good at recognizing words or phrases outside of a specified vocabulary and grammar. It will usually just pick the phrase it thinks is the closest match. This can make it appear foolish or buggy.
The use of a proximity sensor helps prevent random responses to what the Lamp Box might interpret as the wake word or other commands. The design assumes that you have the intention of speaking to the Lamp Box only when you are right in front of it. It would be better if it didn't need this restriction, but that will have to wait for improvements in the voice recognition subsystem.
The Raspberry Pi Zero is not exactly high-powered, and I found it important to provide feedback when it was busy calculating something - otherwise it was hard to tell whether it was thinking hard or just being unresponsive. The row of blue LEDs light up in different patterns to show the status. Also, old-school blinking lights are fun, especially for fans of ancient science fiction TV shows or movies.
Lamp Box wake command:
Display air quality:
Air quality index (AQI) color code, per airnow.gov.
| Range | Category | Color |
|---|---|---|
| 0 - 50 | Good | Green |
| 51 - 100 | Moderate | Yellow |
| 101 - 150 | Unhealthy for Sensitive Groups | Orange |
| 151 - 200 | Unhealthy | Red |
| 201 - 300 | Very Unhealthy | Purple |
| 301 - 500 | Hazardous | Maroon |
Here is how they are rendered by the RGB LED:
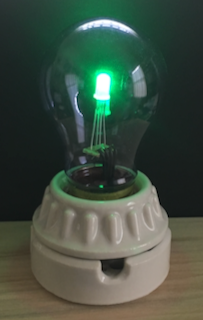
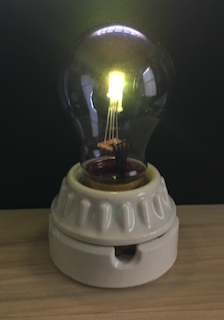
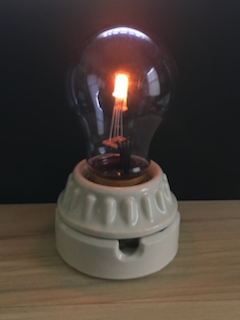
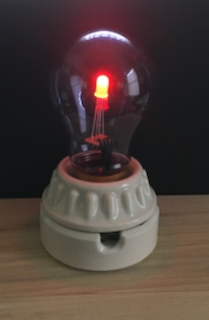
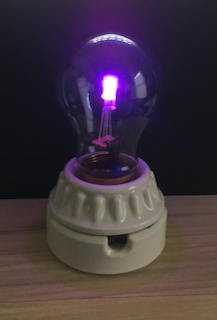
The colors look a bit more realistic in real life than in the above photos, except for maroon, which is hard to generate. Fortunately, the air has never gotten that bad here yet.
Commands
The initial set of commands was chosen to exercise the hardware and software, help debug the system, provide a few useful features, and have fun.
I found that some phrases I tried didn't work well: they were confused with other phrases or they were hard to recognize. Some phrases worked differently with different speakers. If a phrase seemed to give difficulty, I simply kept replacing it with another that had a similar meaning until I found one that worked well enough.
In spite of the fact that the voice recognition code provided a "confidence level" for each result, the system was not very good at distinguishing recognized phrases from unknown phrases. Therefore, it works best to put the voice recognition subsystem to sleep right away when done speaking to the Lamp Box, to avoid spurious responses. This is done by speaking the command, "Sleep," or by pushing the button.
Wake & sleep commands
| "Computer" | Begin listening for further input. |
| "Sleep" | Stop listening until wake command is heard again. |
Unacceptable wake commands
| "Alexa" | Laugh at user. |
| "Hey Google" | Play sound of honking geese. |
| "Hey Siri" | Growl at user. |
Test or demonstrate LEDs
| "Blinky" | Blink blue LEDs from right to left and back. |
| "Think" | Blink blue LEDs randomly for a few seconds. |
| "Think harder" | Same as "Think" command, but blink LEDs faster. |
| "Sparkle" | Rapidly show different colors of RGB LED. |
| "Red light" | Turn on RGB LED to show red. |
| "Green light" | Turn on RGB LED to show green. |
| "Blue light" | Turn on RGB LED to show blue. |
| "Yellow light" | Turn on RGB LED to show yellow. |
| "Orange light" | Turn on RGB LED to show orange. |
| "Purple light" | Turn on RGB LED to show purple. |
| "Maroon light" | Turn on RGB LED to show maroon (actually comes out more like pink). |
| "Lamp off" | Turn off all LEDs. |
Speech commands
| "Change voice" | Change the spoken voice to the next of the 3 available choices. |
| "Repeat after me" | Test voice recognition by repeating back any phrases that are recognized. In this mode, commands are not acted on. To exit this mode, push the button. |
Information commands
| "Weather report" | Fetch and speak current weather report. |
| "Air quality" | Fetch and speak current PM2.5 air quality index. |
| "Show air quality" | Turn on RGB LED to color corresponding to PM2.5 air quality index. |
Control commands
| "Exit program" | Quit the program running Lamp Box. |
| "Shut down computer" | Shut down the Raspberry Pi. |
| "Yes" | The above two commands ask "Are you sure?" before following through on the command. |
| "No" |
Sound commands
| "Play music" | Play music through speaker. |
| "Play song" | Play music through speaker. |
| "Volume up" | Increase speaker volume. |
| "Volume down" | Decrease speaker volume. |
| "Reset volume" | Restore default speaker volume. |
Message commands
| "Record message" | Record a message for later playback. Push button when done recording. Blink RGB and blue LEDs in a distinctive pattern if a message is available. |
| "Play message" | Play the previously-recorded message. |
| "Save" | Save the recorded message, but turn off the message indicator LEDs. (An option after playing the message) |
| "Delete" | Delete the recorded message. (An option after playing the message) |
| "Keep message" | Keep the recorded message, and keep the message indicator LEDs on. (An option after playing the message) |
| "Play again" | Play the message again. (An option after playing the message) |
Hardware Selection
The rest of this article consists of technical details of interest to those who want to know how everything was done, or who might want to build something similar.
Single-board computers
The Raspberry Pi Zero W, the low end version of the current models, had sufficient capability to run the voice recognition code. (Adafruit, $10)
The "Iduino," a clone of the Arduino Nano, served as an auxiliary processor to run the LEDs and the pushbutton. The Arduino boards have a higher current output per pin, making them more convenient as LED drivers. Having another board to run the LEDs also made it easy to animate the LEDs in fun ways while the Raspberry Pi was busy thinking. (The one I used is out of stock, but there are others: eBay, ~ $6)
Level shifter
One of these is used to convert between Arduino 5v and Raspberry Pi 3.3v logic levels. The model I used is no longer listed on eBay, but there are plenty of others, cheap and generic. (eBay, ~ 50¢)
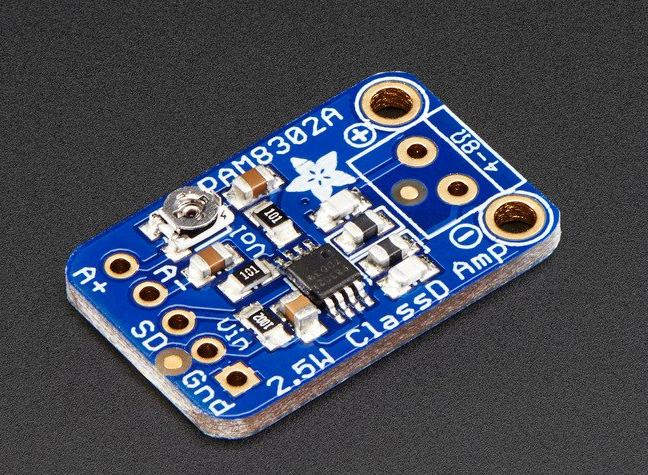
Audio amplifier
I used a mono amplifier to drive the 2" speaker. This is a nice model I've used before; it also has a pin that shuts down the speaker, thus preventing a background hiss from being audible when the speaker is not in use. Supply voltage is 2.7v to 5.5v. (Adafruit, $4)
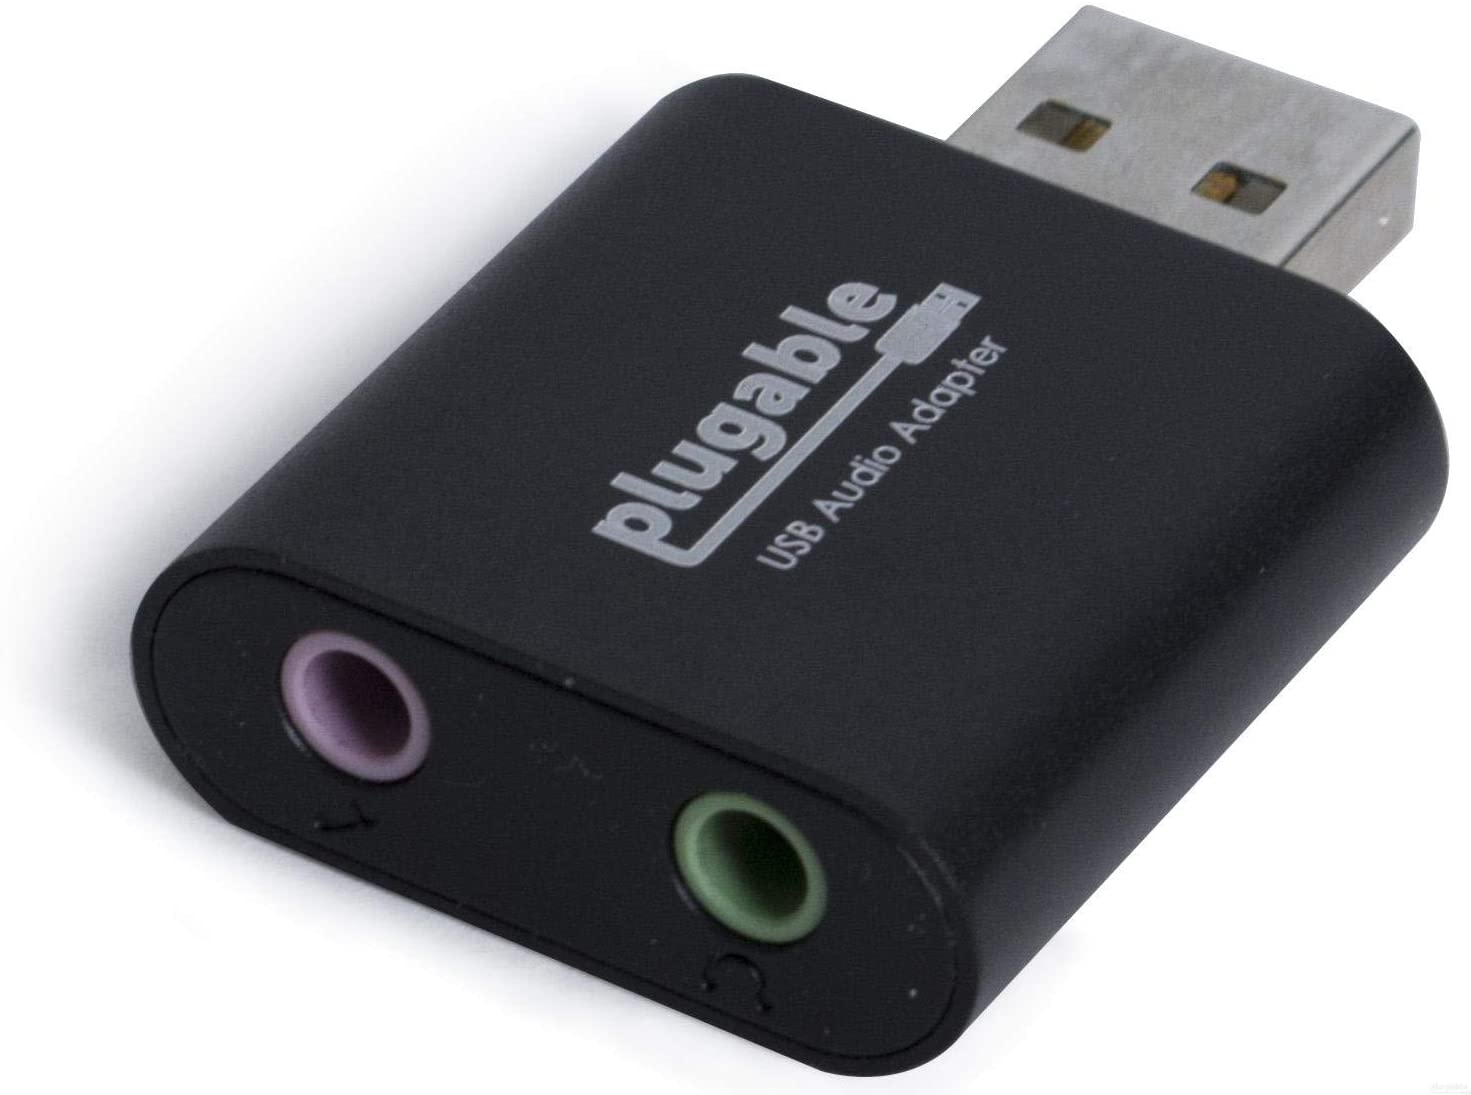
USB audio adapter
I tried other, more direct, methods for audio input and output to/from the Raspberry Pi Zero, but in the end found it simplest and easiest to rely on an all-in-one USB adapter.(Amazon, $10)
Microphone
Tried this and this, but neither worked very well for me.
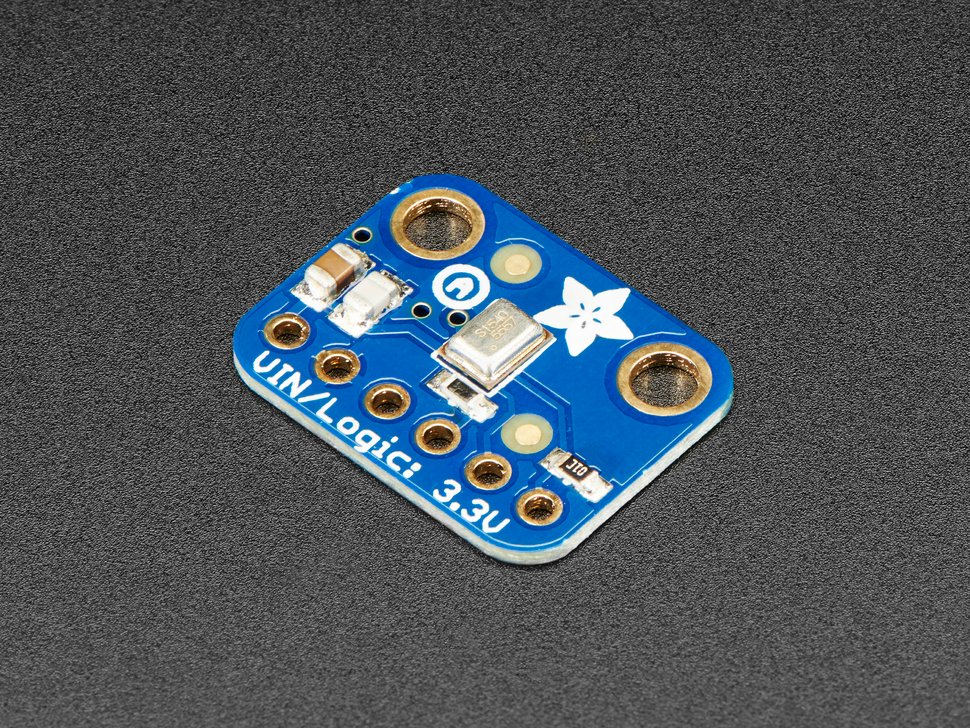

I found this one to be by far the best for speech recognition. It has automatic gain control, and multiple gain options. (Amazon, $9 for 2, appears similar to a model from Adafruit, $8). The supply voltage is 2.7v to 5.5v.

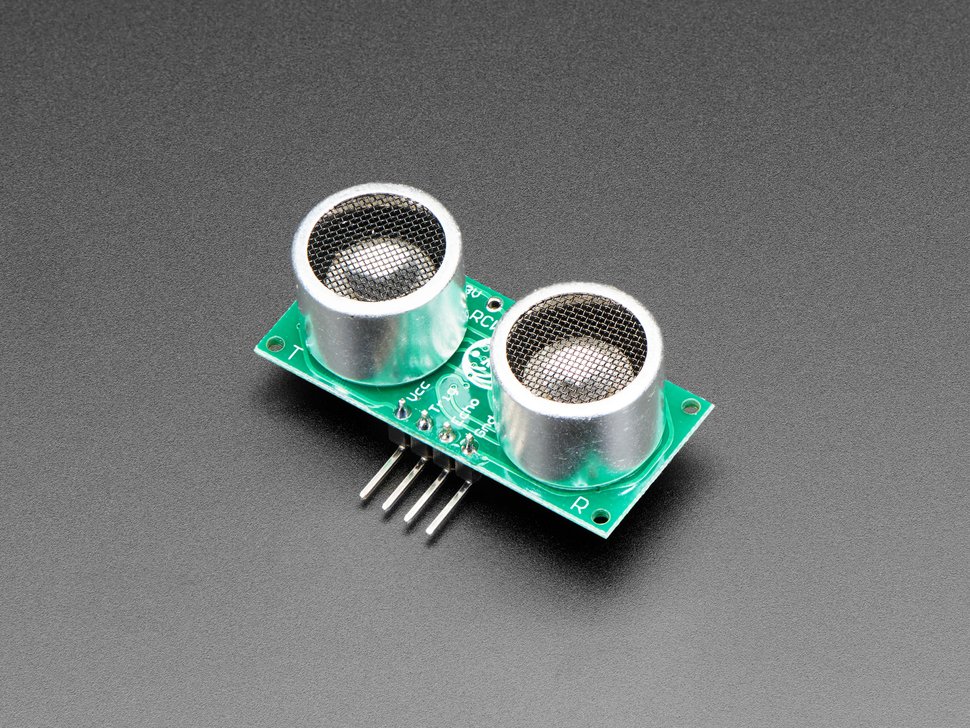
Ultrasonic distance sensor
The speech recognition code was not sophisticated enough to do a good job of distinguishing between the wake word and random speech or sounds. I used a distance sensor to restrict responding to the wake word: the speaker must be directly in front of the box. (Adafruit, $4)
Supply voltage is 3v to 5.5v.
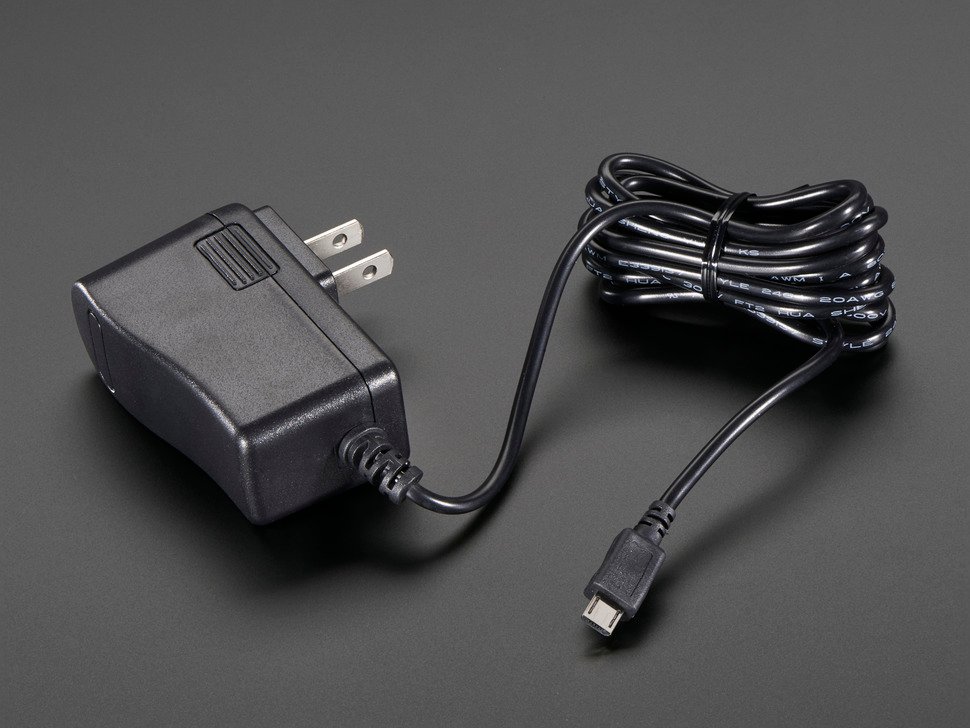
Power supply
Since the unit would be running continuously, I wanted a good-quality, UL-listed power supply, rather than a no-name one from the junk box. This one is ideal for powering the Raspberry Pi and Arduino clone. (Adafruit, $7.50)
Software Selection
Text to speech
I chose Flite ("Festival-light"), a light-weight open source text-to-speech engine with multiple voices. It was simple and easy to use.
On the Raspberry Pi Zero, there is a noticeable delay when flite is sent a long sentence to speak. I used a random blinking pattern on the blue LEDs to indicate that the system was "thinking" about what it was about to say next.
Also considered: espeak and festival.
Speech recognition
I chose Julius, mainly because it was the first I was able to get working; it's not necessarily the best. There is a convenient "Julius QuickStart for Linux" demo. Once that was functioning, I downloaded the latest HTK AcousticModel and developed custom .jconf, .voca, and .grammar files for my application.
Also considered: CMUSphinx, Kaldi, and Jasper.
Sound output
I reused previous code that made use of the OpenAL library for playing .wav files.
Sound input
The speech recognition program handled input from the microphone itself, so I did not need to write any sound input code myself.
One of the commands of the lampbox records a spoken message. To handle this, the main program launches arecord as needed. (The arecord program is installed with the ALSA soundcard driver.)
GPIO interface
The libgpiod library provides access to individual GPIO pins on the Raspberry Pi.
(In the past I've used WiringPi, but that is now deprecated.)
Hardware Details
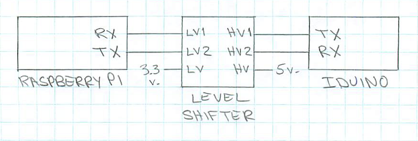
Serial communication between Raspberry Pi and Arduino
Both the Raspberry Pi and the Arduino clone have pinouts for serial communcation. Because the Raspberry Pi operates with 3.3v logic levels and the Arduino operates at 5v. logical levels, I used a level-shifter board. (Some people use methods involving resistive voltage dividers to get the voltages to match up, but given the low cost of the level-shifter, I saw no need to go that route.)
Note that the TX line of the Raspberry Pi goes to the RX line of the Iduino, and vice-versa.
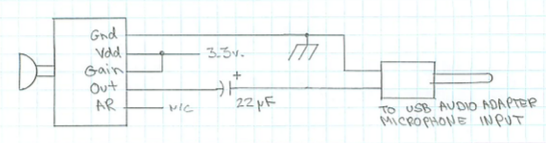
Microphone circuit
Tying the Gain line to Vdd sets the amplification to 40dB. The 22μF coupling capacitor blocks the DC component of the signal.
The plug is a stereo 3 conductor "TRS" (tip-ring-sleeve) type. Mic output is connected to the tip; the sleeve is grounded.
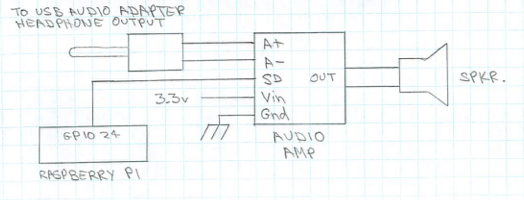
Speaker circuit
The SD shutdown line silences the speaker when the line is set to logic low. The board is fed at 3.3v to match the logic levels of the Raspberry Pi.
The plug is a stereo 3 conductor "TRS" (tip-ring-sleeve) type. The A+ input is connected to the tip; the A- input is connected to the sleeve.
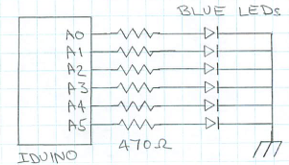
LED circuits
The RGB LED is common-anode. The current-limiting resistors for the red, blue, and green LEDs were determined so that the maximum current in each LED is slightly less than 10 mA.
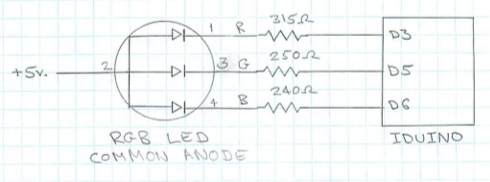
The small blue LEDs were quite bright at 3 mA, which was obtained with 470Ω resistors.
Ultrasonic distance sensor
This sensor is the Adafruit RCWL-1601 model, which is essentially the same as the Adafruit HC-SR04, except that it can run on a voltage range of 3v to 5.5v. This meant it was directly compatible with the Raspberry Pi logic levels, so hookup was straightforward.
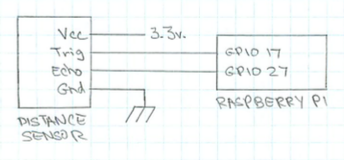
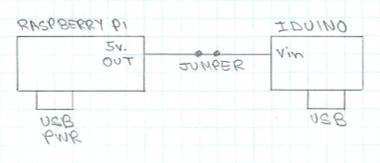
Power Feed & Programing the Arduino
Power is fed directly to the Raspberry Pi via the micro-USB power connector. The Raspberry Pi supplies a 5v. output, which is connected via a jumper to the Iduino Vin line for normal operation. For normal operation, the Iduino USB connector is not used.
Programming the Iduino via the Arduino IDE requires a connection between the Iduino USB connector and the desktop computer. This USB connection then also serves as the power supply for the Iduino. In this case, I pull the jumper connecting the Raspberry Pi and Iduino power supply lines, and for safety, I also unplug the socketed level shifter. This completely isolates the Iduino from the Raspberry Pi circuitry.
Software Details
Auxillary processes
There are three processes running simultaneously at all times on the unit:
lampboxis the main process on the Raspberry Pi.listenis the speech recognition process on the Raspberry Pi.- A process running on the Iduino controls the LEDs and responds to the pushbutton
The following process is invoked as needed from lampbox via the execl() command:
arecord- record from microphone and save to .wav file.
A few shell commands are invoked from lampbox via the system() command.
Speech recognition control
The julius quick-start package included a useful sample program, julius-simple.c. I used this as a model to
make the stand-alone listen application:
Input and output is via stdin and stdout for easy debugging as a
stand-alone program as well as communication with lampbox.
Button debounce
The debounce algorithm in the Arduino code waits 10 milliseconds after any change in the button's pressed/released state before reporting the next state change.
Distance fluctuations
The distance measuring code is simple enough, and based on the sample code from Adafruit: send a 10 μsec pulse to the sensor's trigger line, then time how long it takes for the echoing pulse to appear on the sensor's echo line. Then do multiplication by a constant to get the distance.
What makes it slightly trickier is that sometimes the echo pulse is not detected, so a timeout is necessary, and sometimes the distance fluctuated wildly on occasion. An adequate solution was to use the median value of the three most recent measurements, taking measurements every 300 msec.
The system only responds to speech when it senses the person speaking to be close enough to the box. At first it was coded to only respond if the person was close enough immediately before speech began. Usability improved when this restriction was loosened to accept speech as long as someone was measured as being close enough at any time in the previous 3 seconds.
LED control language
The LEDs and the push button are connected to the Iduino. I implemented a human-readable control language to interface with the Arduino code via the serial port. This made the code easy to develop and debug via the Arduino IDE. Once it was working, I could use the same serial interface for communication with the main program running on the Raspberry Pi.
Each command consists of a letter, followed by an integer, followed by a terminator (space or newline). A command string consists of one of more commands. For example, this command string turns on the rightmost 3 blue LEDs and turns off the leftmost 3 blue LEDs. (The row of small blue LEDs are numbered 0 to 5 right to left.)
H0 H1 H2 L3 L4 L5
There are commands to set up a loop that either runs for a certain number of iterations or indefinitely until cancelled. This allows for more complicated operations, such as pulsing the RGB LED or blinking the blue LEDs in a pattern, to run independently and asynchronously with respect to the Raspberry Pi.
Full list of commands follows:
Hn |
Turn on (set voltage high) small blue LED #n. |
Ln |
Turn off (set voltage low) small blue LED #n. |
Rn |
Set brightness of RGB LED red to n (scale of 0-255). |
Gn |
Set brightness of RGB LED green to n (scale of 0-255). |
Bn |
Set brightness of RGB LED blue to n (scale of 0-255). |
S0 |
Set brightness of RGB LED red to a random value 0-255. |
S1 |
Set brightness of RGB LED green to a random value 0-255. |
S2 |
Set brightness of RGB LED blue to a random value 0-255. |
F0 Rx Gy Bz |
Set up RGB LED fade from current values to red=x green=y blue=z. |
Fn |
Begin fading RGB LED according to previous setup; fade to occur over n msec. |
Qn |
Set small blue LED #n randomly either on or off. |
Tn |
Pause for n msec. |
C0 |
Begin recording following commands for use as a loop. |
Pn |
End recording commands, play as loop for n cycles. |
P0 |
End recording commands, play as loop continuously until cancelled. |
X0 |
Halt all executing commands, ignore remainder of command string. |
X1 |
Finish currently executing loop, if any, then proceed. |
D0 |
Turn on debugging flag, send debug text to serial output. |
Vocabulary and grammar definitions
The vocabulary and grammar definitions are in two files, listen.voca and
listen.grammar. The sounds of the individual words are defined in the vocabulary file,
and the legal combinations of those words are defined in the grammar file.
The dict file is available in the acoustic model package
(i.e., HTK AcousticModel), and served as the source
for the word definitions. To add a new word to be recognized, I looked up the entry in the
dict file, and then added it to the vocabulary file. Initially, I found that some
sound combinations in the dict file could not be recognized; this was solved by using the
latest version of the acoustic model package.
A sample of a vocabulary file looks like this:
% RGB_COLOR
RED           r eh d
GREEN         g r iy n
BLUE          b l uw

% ORANGE
ORANGE        ao r ah n jh

% LIGHT
LIGHT         l ay t

% LAMP
LAMP          l ae m p

% LAMP_OFF
LAMP_OFF          l ae m p ao f

% ON_OFF
ON            aa n
OFF           ao f
Words that have a syntactically identical function can be listed in groups; this avoids having to make a separate entry for each word in the grammar file.
A sample of the grammar file looks like this:
S : NS_B RGB_COLOR LIGHT NS_E
S : NS_B ORANGE LIGHT NS_E
S : NS_B LAMP ON_OFF NS_E
S : NS_B LAMP_OFF NS_E
NS_B and NS_E refer to beginning and ending silence respectively.
In practice, I found that the system sometimes had difficulty recognizing phrases when the words were run together. This required adding what seemed like an unnatural pause between between words. So, "lamp [pause] off" worked, but when the words were spoken naturally it sounded more like, "lam poff," and it failed. I adopted the hack of adding a separate vocabulary word, e.g., "lampoff," to fix the problem as needed.
Weather report data
For this proof of concept, I am using the legacy forecast.weather.gov API to get the
current National Weather Service forecast in XML, followed by ad hoc hacking to dig out the forecast
text. This is not recommended. For future development, it is best to use the newer JSON
interface at api.weather.gov, which is documented
here.
Air quality data
I obtained air quality data from https://www.airnow.gov. Their API is documented at https://docs.airnowapi.org.
The specific URL I used is of the form:
https://www.airnowapi.org/aq/observation/zipCode/current/?format=text/csv&zipCode=94706&distance=15&API_KEY=00000000-0000-0000-0000-000000000000
where 00000000-0000-0000-0000-000000000000 is replaced with the private API key that I obtained by signing up at
https://docs.airnowapi.org/login. It's free - they just don't want the API bombarded with requests, so by
requiring a key they cam limit access rate to something reasonable.
The return from the URL is csv text of the following form:
"DateObserved","HourObserved","LocalTimeZone","ReportingArea","StateCode","Latitude","Longitude","ParameterName","AQI","CategoryNumber","CategoryName"
"2021-10-26 ","14","PST","Oakland","CA","37.8","-122.27","O3","31","1","Good"
"2021-10-26 ","14","PST","Oakland","CA","37.8","-122.27","PM2.5","39","1","Good"
It is straightforward to dig out the relevant information, "PM2.5","39", and
convert it to spoken text.
Software Setup & Installation
I don't suggest anyone to try to exactly re-create what I built. I include the following instructions in the hope they may prove useful examples for anyone trying to develop a similar system. Source files are available for inspection at https://github.com/7402/lampbox.
Initial setup
- Flash 16GB SD card with raspios-buster-armhf-lite.
- Enable ssh.
- Set up WiFi access and static IP address.
- Change password.
System configuration
Connect via ssh and call config program.
sudo raspi-config
Select options:
- System Options > Hostname: lampbox
- Interface > Serial Port: disable serial login shell, enable serial interface.
- Localisation Options > Timezone > Us > Pacific Ocean.
- Localisation Options > Locale: en_US.UTF-8 UTF-8
- Localisation Options > Default locale: en_US.UTF-8 UTF-8
Reboot, update, create directories.
sudo reboot

sudo apt-get update
sudo apt-get upgrade

sudo apt-get install ntp
sudo apt-get install ntpdate
sudo service ntp start

mkdir Projects
mkdir Music
mkdir Messages
mkdir Voices
Sound setup
Copy music and sound files to /home/pi/Music/
Edit alsa.conf
sudo vi /usr/share/alsa/alsa.conf
and change the indexes as follows:
defaults.ctl.card 1
defaults.pcm.card 1
Reboot, adjust sound levels, and test playing sound.
sudo reboot

alsamixer
speaker 15%
capture 31%

aplay ~/Music/Bell-Fight-44M.wav
Test recording and playing back.
arecord foo.wav
aplay foo.wav

rm foo.wav
Test Serial Port
Install screen program to communicate with serial port.
sudo apt-get install screen

screen /dev/ttyS0 115200
Test communication with Arduino. (assumes Arduino software has already been uploaded.)
H1
L1
R255
R0 B255
B0 G255
G0
Push button on lampbox, observe output. To exit screen, type Ctrl-A then k.
Build, Install, Test OpenAL
# Be sure to install these before building:
sudo apt-get install libasound2 libasound2-dev

cd ~/Projects
wget https://www.openal-soft.org/openal-releases/openal-soft-1.21.1.tar.bz2
tar jxf openal-soft-1.21.1.tar.bz2
cd openal-soft-1.21.1
cd build

sudo apt-get install cmake
cmake ..
make
sudo make install
sudo ldconfig
Edit audio.conf
sudo vi /etc/security/limits.d/audio.conf
and include this line:
@audio - rtprio 95
Reboot.
sudo reboot
Install mbeep (to test use of OpenAL).
cd ~/Projects
wget https://github.com/7402/mbeep/archive/refs/tags/v0.9.7.1.zip
unzip v0.9.7.1.zip
cd mbeep-0.9.7.1

make
./mbeep --man-page > mbeep.1
sudo make install
Try sound.
mbeep
Install flite
sudo apt-get install flite flite1-dev

cd ~/Voices
curl -O http://www.festvox.org/flite/packed/flite-2.0/voices/cmu_us_bdl.flitevox
curl -O http://www.festvox.org/flite/packed/flite-2.0/voices/cmu_us_clb.flitevox
curl -O http://www.festvox.org/flite/packed/flite-2.0/voices/cmu_us_jmk.flitevox
Test flite.
flite -t "Hello, World."
Install libraries for GPIO communication
sudo apt-get install libgpiod-dev
sudo apt-get install gpiod
sudo apt-get install raspi-gpio
Test distance sensor (using Adafruit code)
Set up directory, install software.
mkdir ~/pysonar
cd ~/pysonar

sudo apt-get install libgpiod-dev
sudo apt-get install python3-venv
Type
python3 -m venv .env
and then enter
source .env/bin/activate
Install Adafruit package.
pip3 install adafruit-circuitpython-hcsr04
Create test program.
vi pysonar.py
Insert code and save.
import time
import board
import adafruit_hcsr04

sonar = adafruit_hcsr04.HCSR04(trigger_pin=board.D17, echo_pin=board.D27)

while True:
    try:
        print((sonar.distance,))
    except RuntimeError:
        print("Retrying!")
    time.sleep(0.5)
Run.
python3 pysonar.py
(Type ctrl-C to halt.)
Build Julius speech recognition
sudo apt-get install build-essential zlib1g-dev libsdl2-dev
sudo apt-get install libasound2-dev
sudo apt-get install libjcode-pm-perl

cd ~/Projects
wget https://github.com/julius-speech/julius/archive/refs/heads/master.zip
unzip master.zip
cd julius-master

./configure --enable-setup=standard --enable-words-int
make
sudo make install
Test speech recognition with Quick Start
cd ~/Projects
wget http://www.repository.voxforge1.org/downloads/Main/Tags/Releases/0.9.0/Julius-4.3.1-Quickstart-Linux_\(0.9.0\).tgz
tar -xvzf Julius-4.3.1-Quickstart-Linux_\(0.9.0\).tgz

cd ~/Projects/julius-4.3.1-quickstart-linux
julius -input mic -C Sample.jconf
This sample recognizes a few words for voice control of a phone.
See description of the grammar at ~/Projects/julius-4.3.1-quickstart-linux/GRAMMAR_NOTES.
Build and test custom listening & recognition code
Get latest nightly build of VoxForge acoustic model.
from http://www.repository.voxforge1.org/downloads/Nightly_Builds/AcousticModel-2021-01-25/mkdir ~/Projects/listen
cd ~/Projects/listen
wget http://www.repository.voxforge1.org/downloads/Nightly_Builds/AcousticModel-2021-01-25/HTK_AcousticModel-2021-01-25_16kHz_16bit_MFCC_O_D.zip
unzip HTK_AcousticModel-2021-01-25_16kHz_16bit_MFCC_O_D.zip
Copy source files for listen to ~/Projects/listen
- listen.jconf
- listen.voca
- listen.grammar
- main.c
- Makefile
Build and test.
make
mkdfa.py listen
./listen
Build lampbox program
sudo apt-get install libcurl4-gnutls-dev

mkdir ~/Projects/lampbox
cd ~/Projects/lampbox
Copy source files for lampbox to ~/Projects/lampbox
- arduino.c
- arduino.h
- gpio_ctrl.c
- gpio_ctrl.h
- listen.c
- listen.h
- main.c
- Makefile
- mute.c
- mute.h
- parse_web.c
- parse_web.h
- phrases.c
- phrases.h
- play.c
- play.h
- record.c
- record.h
- sonar.c
- sonar.h
- sound.c
- sound.h
- speak.c
- speak.h
make
Test program by running without speech recognition. In this mode, the application accepts typed words via
standard input instead of from the listen program.
./lampbox --nolisten
Run program in usual mode, where command input is received from the concurrently-running listen program
./lampbox
Auto-start lampbox on startup
Following the answer from here, create lampbox.service:
sudo vi /etc/systemd/system/lampbox.service
and insert
[Unit]
Description=Start lampbox
After=multi-user.target

[Service]
Type=oneshot
RemainAfterExit=no
User=pi
ExecStart=/home/pi/Projects/lampbox/lampbox


[Install]
WantedBy=multi-user.target
Enable the service.
sudo systemctl enable lampbox.service
Enable Read-only System
See [Live boot Raspbian OS] at https://7402.org/blog/2020/paranoid-password-printing-pi.html
To contact the author, send email.