Running WSJT-X on a Raspberry Pi with iPad as Display
In the previous post, Yaesu FT-891 operating WSPR digital mode with macOS, I documented transmitting and receiving WSPR with WSJT-X software running on a Mac Mini M1. To reduce the amount of RFI generated by my computer and monitor, I set up a system using a Raspberry Pi 3B+ computer, with an Apple iPad providing the display for the user interface.
Set up Raspberry Pi screen sharing
Prepare an SD card with Raspberry Pi OS Lite downloaded from https://www.raspberrypi.com/software/operating-systems/, for example 2022-09-22-raspios-bullseye-armhf-lite.img.xz. Create a user (e.g., "user") and enable ssh access.
Install graphical user interface.
sudo apt update
sudo apt upgrade

sudo apt install -y xserver-xorg
sudo apt install -y raspberrypi-ui-mods
sudo apt install -y xinit
Install and set up VNC Server. Choose a new VNC password (e.g., "screenpw") that is different from any other system password.
sudo apt install -y tightvncserver
vncserver :1 -geometry 1600x1000
Password: screenpw
Configure desktop to login automatically.
sudo raspi-config
System Options > Boot / Auto Login: Desktop Autologin
Set tightvncserver to start automatically.
cd ~/.config
mkdir autostart
cd autostart
vi tightvnc.desktop
Insert text:
[Desktop Entry]
Type=Application
Name=TightVNC
Exec=vncserver :1 -geometry 1600x1000
StartupNotify=false
Reboot.
sudo reboot
Connect to Raspberry Pi screen from macOS
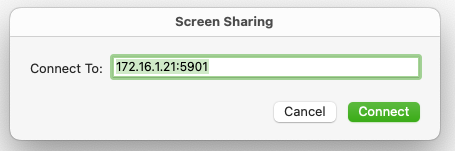
The built-in macOS screen sharing app is hidden at HD > System > Library > CoreServices > Applications > Screen Sharing. Launch it, and enter the IP address of the Raspberry Pi and the port (5901) as shown. Enter the screen password when requested.
Connect to Raspberry Pi screen from iOS
I use the Remoter VNC app. It costs $3.99, a bargain.
Launch app, and tap plus sign in upper left corner to add a host (the Raspberry Pi).

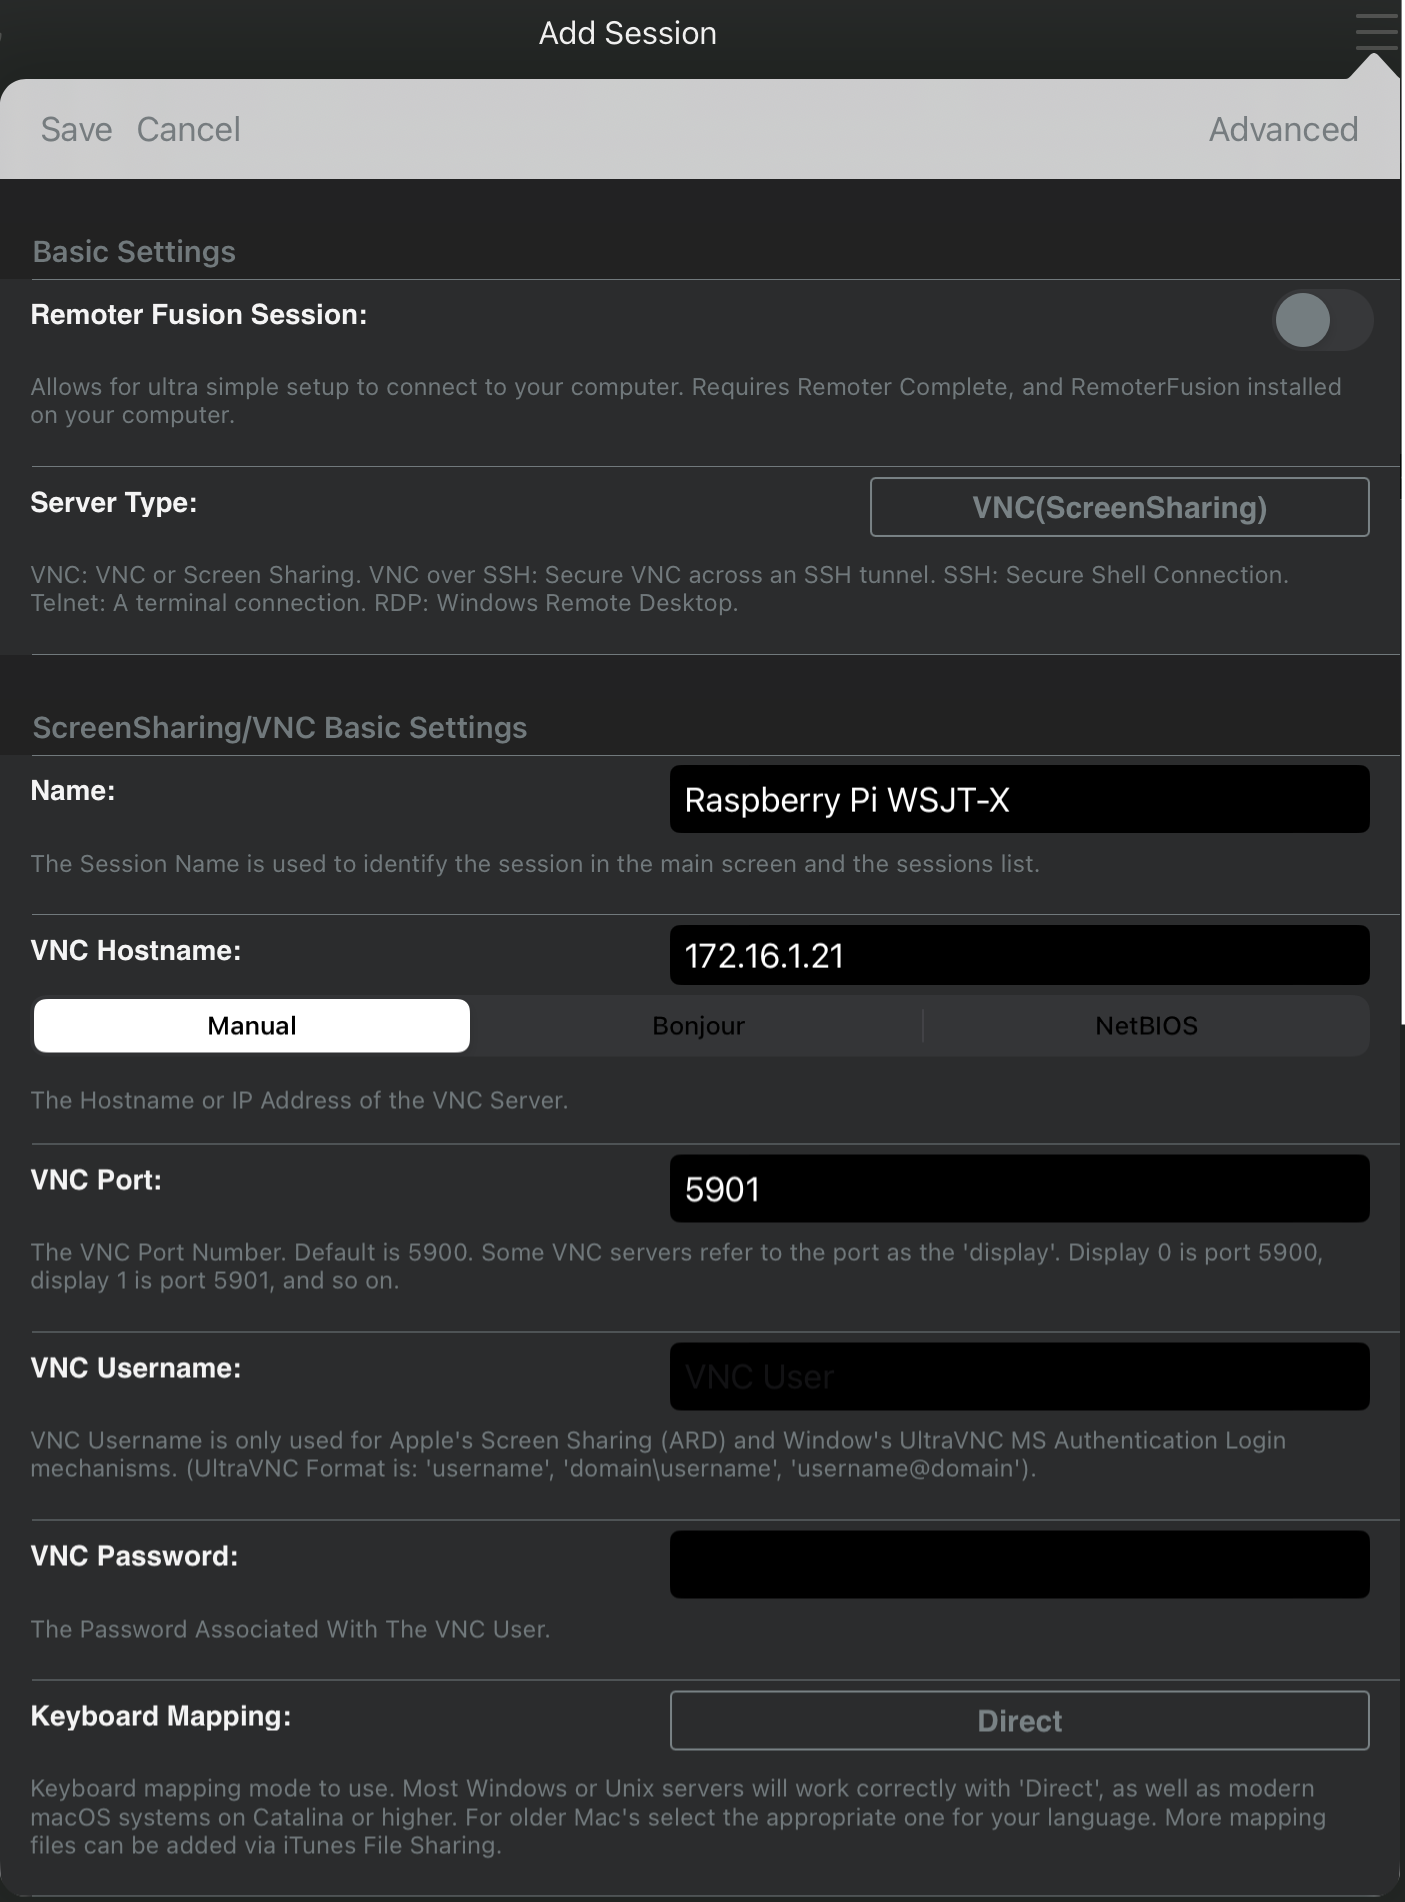
Tap the square labelled Add Session Manually.

Select VNC(Screen Sharing) for the Server type, then enter the fields as follows:
| Server Type | VNC(Screen Sharing) |
|---|---|
| Name | [Choose a name] |
| VNC Hostname | [IP address of Raspberry Pi] |
| VNC Port | 5901 |
| VNC Password | [e.g., screenpw] |
Tap Save when done.
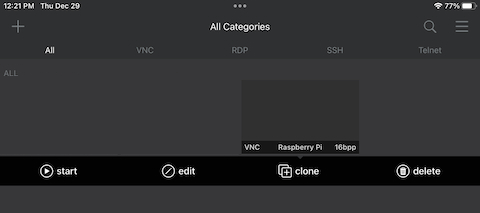
Tap the box for the Raspberry Pi host, then tap Start. The Raspberry Pi screen should appear.
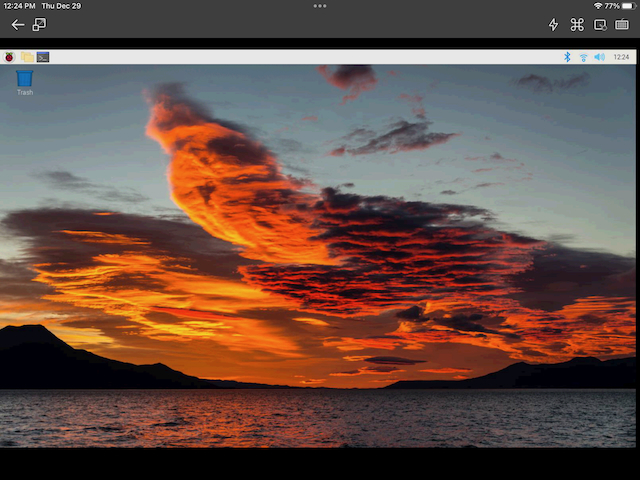
If the screen saver appears, tap the trackpad control (upper right, next to the keyboard icon) and use the trackpad to double-tap the screen saver and make the regular screen appear.
Compiling WSJT-X
WSJT-X source code is maintained at SourceForge. Download and unpack it:
cd ~/Downloads
wget -O wsjtx-2.5.4.tgz https://sourceforge.net/projects/wsjt/files/wsjtx-2.5.4/wsjtx-2.5.4.tgz/download
tar -zxvf wsjtx-2.5.4.tgz
Install libraries:
sudo apt install -y build-essential
sudo apt install -y git
sudo apt install -y cmake
sudo apt install -y automake
sudo apt install -y libtool
sudo apt install -y asciidoc
sudo apt install -y texinfo
sudo apt install -y qtmultimedia5-dev libqt5serialport5-dev qttools5-dev
sudo apt install -y qttools5-dev-tools libboost-all-dev libfftw3-dev
sudo apt install -y libreadline-dev libusb-1.0-0-dev libudev-dev portaudio19-dev
Build. This took more than an hour.
mkdir build
cd build
cmake -DWSJT_SKIP_MANPAGES=ON -DWSJT_GENERATE_DOCS=OFF ../wsjtx-2.5.4
cmake --build .
sudo cmake --build . --target install
This library is not required for building, but it is required for running wsjtx.
sudo apt install -y libqt5multimedia5-plugins
The CP210 driver is distributed as part of the Linux kernel, so it is not necessary to install it (unlike for macOS or Windows).
Setup and operation
Hook up the USB cable, Plugable Audio Interface, and audio cables as described in Yaesu FT-891 operating WSPR digital mode with macOS. Turn on the FT-891, attach dummy load, and reboot Raspberry Pi.
Connect via screen sharing.
Click/tap on Raspberry > Run, enter "wsjtx", click OK. WSJT-X should start.
Menu selections
| View | Waterfall |
|---|---|
| Mode | WSPR |
| Decode | Deep |
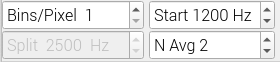
You may need to move the main window to see the waterfall. Theses setting in the lower left corner of the waterfall display are good for WSPR:
WSJT Settings: General
| My Call | [your call] |
|---|---|
| My Grid | [your 6-character Maidenhead locator] |
| IARU Region | Region 1 — Africa, Europe, Middle East, and northern Asia Region 2 — the Americas Region 3 — the rest of Asia and the Pacific |
System Settings: Audio
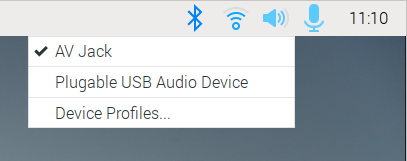
Click the speaker icon in the upper left corner, and set the default audio device to be something other than the Plugable inteface. (You do not want system sounds and beeps getting sent to the rig!)
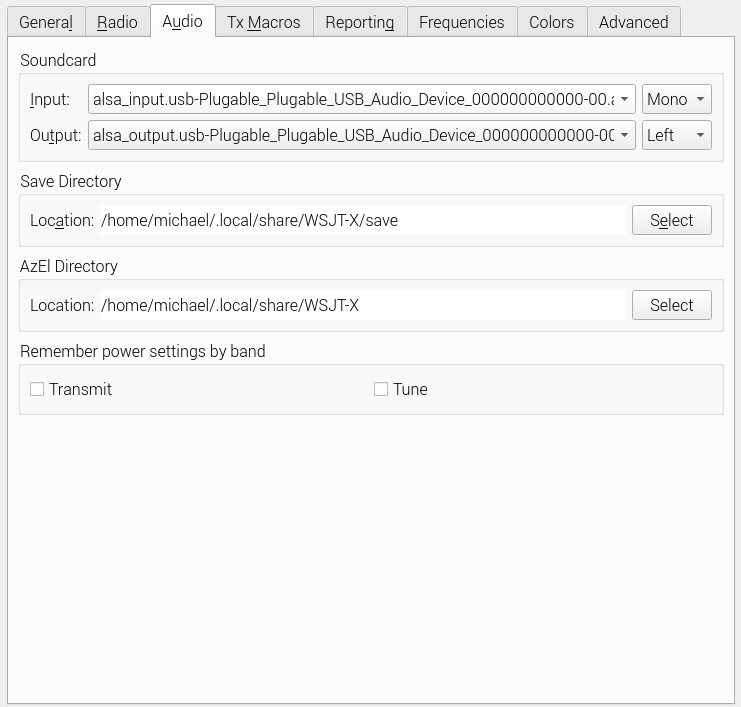
WSJT Settings: Audio
| Input | alsa_input.usb-Plugable_Plugable_USB_Audio_Device_... | Mono |
|---|---|---|
| Output | alsa_output.usb-Plugable_Plugable_USB_Audio_Device_... | Left |
If the audio device does not appear in the popup menus, try quitting WSJT-X, unplugging and replugging the device, restarting, etc.
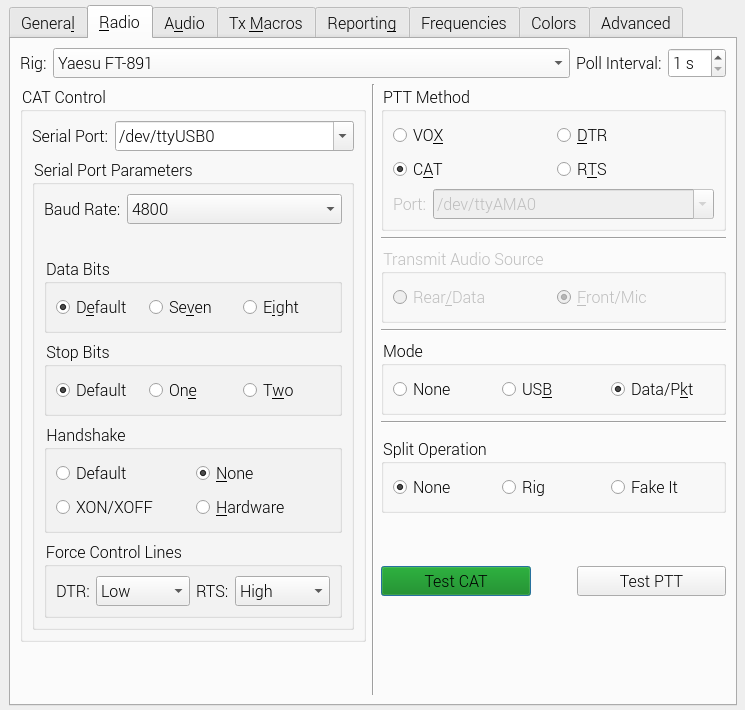
WSJT Settings: Radio
| Rig | Yaesu FT-891 |
|---|---|
| Serial Port | /dev/ttyUSB0 |
| Baud Rate | 4800 |
| Data Bits | Default |
| Stop Bits | Default |
| Handshake | None |
| Force Control Lines | |
| DTR | Low |
| RTS | High |
| PTT Method | CAT |
| Mode | Data/Pkt |
| Split Operation | None |
The ttyUSB0 option seemed to work for me, but it might be necessary to switch to ttyUSB1 if it doesn't. Use the Test CAT button to check.
Audio levels
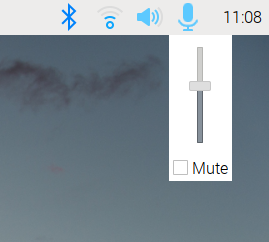
Click the microphone icon in the upper right corner, and adjust the level for about 30 dB background noise level.
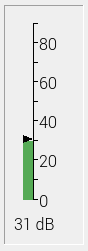
Select the Raspberry > Sound & Video > PulseAudio Volume Control menu item to show the volume controls. With the FT-891 hooked up to a dummy load and the MTR set to show ALC, adjust the Pwr control in the WSJT window and the Plugable USB Audio Device Analog Stereo level so that the ALC level just reaches zero.

To contact the author, send email.